Love this? Save it for later!
Share the inspiration with your friends
This was supposed to be a proper California roll. I mean, I had the nori sheets, the sushi rice was cooling on the counter, and I even had that little bamboo mat my sister bought me from a kitchen store downtown. But my three-year-old was having a meltdown over a broken crayon, the rice cooker timer was beeping, and I grabbed the wrong package from the fridge. Instead of crab sticks, I pulled out a pack of sliced turkey. I stood there for a solid minute, staring at the turkey, then at the rice, then back at the turkey. Honestly, I almost just made a sandwich. But the rice was already made, and I am not one to waste food. So I laid out that nori, spread the rice, laid down the turkey, added a slice of cheddar, and rolled it up tight. It looked ridiculous. It felt wrong. And then my kid ate three of them without a single complaint.
That was two years ago, and these Easy Turkey and Cheese Sushi Rolls have been a staple in our lunch rotation ever since. They are not fancy. They are not traditional. But they are genius in that “why didn’t I think of this sooner” kind of way. Maybe you have been there—staring into your fridge at 11 AM wondering what to pack for lunch that is not another sad sandwich. These rolls are the answer. They come together in ten minutes, use ingredients you probably already have, and somehow make lunch feel special without any extra effort. Let me tell you, there is something deeply satisfying about cutting a turkey and cheese roll into perfect little circles and watching everyone at the table smile.
Why You’ll Love This Recipe
These Easy Turkey and Cheese Sushi Rolls are not just another lunch idea—they are a game changer for busy mornings and picky eaters. I have tested this recipe dozens of times with different fillings, different breads, and different wrapping techniques. This version is the one that stuck because it just works.
- Quick & Easy: You can make these in under 10 minutes. No cooking required if you use deli meat and pre-made tortillas. Perfect for those mornings when you are running late.
- Simple Ingredients: You only need four main ingredients—tortillas, cream cheese, turkey, and cheese. No fancy sushi mats or nori sheets required.
- Perfect for Lunch Boxes: These rolls hold up beautifully in a lunch box. They do not get soggy, they travel well, and kids love the fun shape.
- Crowd-Pleaser: I have served these at playdates, picnics, and even a casual brunch. Adults and kids alike grab them up. There is something about the pinwheel shape that makes everyone happy.
- Unbelievably Delicious: The cream cheese binds everything together, the turkey adds savory protein, and the cheese gives that melty, satisfying finish. It is comfort food in a bite-sized package.
What makes this recipe different from the hundreds of other roll-up recipes out there is the technique. I spread the cream cheese all the way to the edges of the tortilla—no bare spots. That thin layer acts as glue, holding everything together so your rolls do not unravel. I also learned the hard way that pressing the rolls gently after wrapping them helps them stay tight. This is not just another version of a pinwheel sandwich. It is the best version, tested by a mom who has made hundreds of these over two years.
This recipe is the kind that makes you close your eyes after the first bite. Not because it is gourmet, but because it is exactly what you needed—simple, satisfying, and made with love. It is lunch box comfort food reimagined: faster, easier, and with the same soul-soothing satisfaction as a warm sandwich. Perfect for impressing your kids without stress, or turning a plain Tuesday lunch into something memorable.
What Ingredients You Will Need
This recipe uses simple, everyday ingredients to create something unexpectedly fun. You probably have most of these in your kitchen right now.
- Flour tortillas (8-inch, soft taco size): These are the best size for rolling. Burrito-sized tortillas make rolls that are too big, and fajita-sized ones are too small. I prefer Mission brand for their flexibility, but any soft flour tortilla works. Corn tortillas are too brittle and will crack.
- Cream cheese (4 ounces, softened): This is the glue that holds everything together. Full-fat cream cheese gives the best flavor and texture. Let it sit out for 15 minutes to soften, or microwave for 10 seconds. Neufchâtel (low-fat) cream cheese works too, but the rolls may be slightly less stable.
- Turkey slices (4-6 slices, depending on thickness): Use your favorite deli turkey. Oven-roasted, smoked, honey—they all work. I like Boar’s Head oven-roasted turkey breast for its clean flavor. You want thin slices that lay flat, not thick chunks. Leftover roasted turkey also works beautifully.
- Cheese slices (4 slices): Cheddar, provolone, Swiss, or mozzarella all work great. I usually use sharp cheddar because it adds a nice tang against the creamy turkey. Provolone gives a milder, more traditional “sushi” feel. Avoid pre-shredded cheese—it does not lay flat and makes rolling difficult.
- Optional add-ins: Thin cucumber strips, avocado slices, lettuce leaves, or bell pepper strips. These add crunch and freshness but are completely optional. If you add wet ingredients like cucumber, pat them dry first to prevent sogginess.
For the best results, use room temperature cream cheese. Cold cream cheese tears the tortilla when you try to spread it. I learned this the hard way on my third attempt—the tortilla ripped, and I had to start over. Now I always set the cream cheese out while I gather the other ingredients.
If you want a gluten-free version, use gluten-free tortillas. They are more delicate, so spread the cream cheese gently. For a dairy-free option, use dairy-free cream cheese and your favorite dairy-free cheese slices. The texture will be slightly different, but the concept still works.
Equipment Needed
You do not need any fancy equipment for these rolls. That is part of the beauty.
- Cutting board: A large, flat surface for assembling and cutting. I use a wooden cutting board, but any clean surface works.
- Butter knife or offset spatula: For spreading the cream cheese. An offset spatula gives you more control, but a regular butter knife works fine.
- Sharp knife: A serrated knife works best for cutting through the tortilla without squishing it. A chef’s knife also works if it is sharp. Dull knives will smash the roll and make a mess.
- Plastic wrap (optional): Wrapping the rolls in plastic wrap before chilling helps them stay tight. Not strictly necessary, but it makes cleaner cuts.
- Toothpicks (optional): If you are packing these for lunch, toothpicks help hold the rolls together in the container. Use colorful ones to make them fun for kids.
I have made these rolls using nothing but a butter knife and a dinner plate when I was camping. They were not as pretty, but they tasted just as good. Do not let a lack of fancy tools stop you from trying this recipe.
Preparation Method
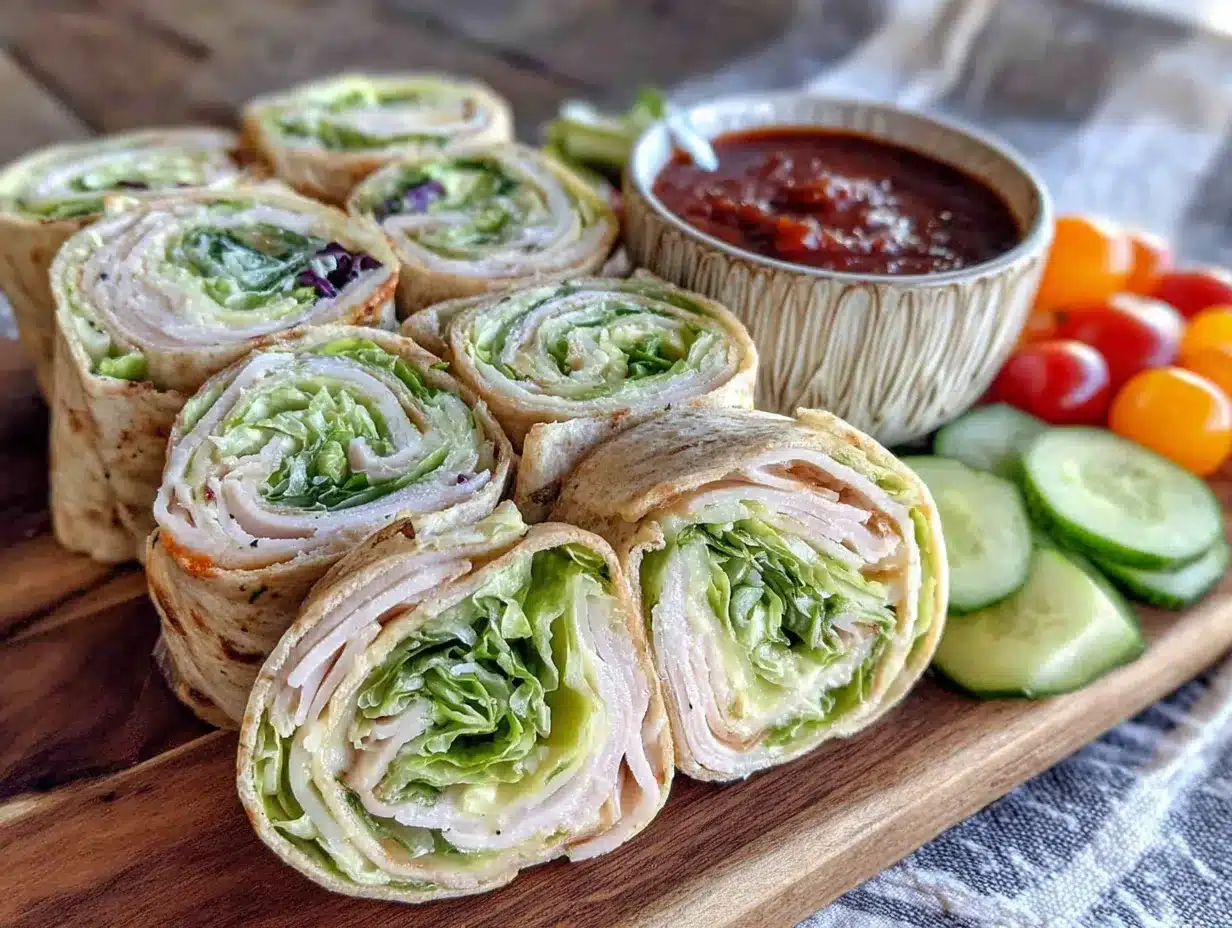
Making these Easy Turkey and Cheese Sushi Rolls is straightforward, but a few small techniques make a big difference. Follow these steps for perfect rolls every time.
- Soften the cream cheese: Take the cream cheese out of the fridge 15-20 minutes before you start. If you forgot, microwave it for 10 seconds on low power. It should be spreadable but not melted. Cold cream cheese will tear your tortilla—trust me, I have ruined three tortillas this way.
- Prepare your work surface: Lay a flour tortilla flat on your cutting board. Make sure it is at room temperature. Cold tortillas crack when you roll them. If your tortillas are straight from the fridge, microwave them for 10 seconds to warm them up.
- Spread the cream cheese: Using your butter knife or offset spatula, spread a thin, even layer of cream cheese over the entire surface of the tortilla. Go all the way to the edges—this is what seals the roll. Use about 2 tablespoons per tortilla. Too little cream cheese and the roll will not stick. Too much and it will squish out the sides when you cut it.
- Layer the turkey: Place 1-2 slices of turkey flat on the cream cheese, covering the surface. Overlap the slices slightly so there are no gaps. If your turkey slices are thick, use one slice per tortilla. If they are thin, use two.
- Add the cheese: Lay one slice of cheese on top of the turkey. If you are using add-ins like cucumber or avocado, place them in a line about an inch from the edge of the tortilla—this will be the center of your roll.
- Roll it up tight: Starting from one edge, roll the tortilla tightly but gently. Use your fingers to keep the filling tucked in as you go. Roll all the way to the end, then press gently to seal the seam. The cream cheese should hold it closed. If it does not, add a tiny bit more cream cheese to the edge before sealing.
- Wrap and chill (optional but recommended): Wrap the rolled tortilla tightly in plastic wrap. Twist the ends like a candy wrapper to keep it snug. Refrigerate for 10-15 minutes. This step firms up the cream cheese and makes cutting much cleaner. If you are in a hurry, skip this step—your cuts will just be a little messier.
- Cut into pinwheels: Using a sharp serrated knife, slice the roll into 1-inch pieces. Use a gentle sawing motion—do not press straight down or you will squish the roll. You should get about 6-8 pieces per tortilla. If the roll starts to unravel, pop it back in the fridge for 5 minutes.
- Arrange and serve: Place the pinwheels on a plate or in a lunch box. They look beautiful arranged in a circle with the cut sides facing up. Add a few toothpicks if you are packing them for lunch.
The first time I made these, I skipped the chilling step and tried to cut them immediately. The cream cheese smeared everywhere, the turkey slid out, and I ended up with a pile of sad, messy pieces. Now I always chill them for at least 10 minutes. That little wait makes all the difference between gorgeous pinwheels and a frustrated mess.
Cooking Tips & Techniques
After making these rolls dozens of times, I have learned a few tricks that separate good rolls from great ones.
The cream cheese is your glue. Spread it all the way to the edges. I cannot emphasize this enough. A bare spot on the edge means the roll will pop open when you cut it. If you are using flavored cream cheese, like chive and onion, it adds another layer of flavor. I have used strawberry cream cheese for a sweet version, and it was surprisingly good with turkey.
Do not overstuff. It is tempting to pile on the fillings, but too much makes the roll impossible to close and the filling squishes out the sides. Stick to one layer of turkey and one slice of cheese. If you want more flavor, use a sharper cheese or add a thin spread of mustard or pesto on top of the cream cheese.
Use a serrated knife for cutting. I used a straight chef’s knife for my first few attempts, and it mashed the rolls flat. A serrated knife cuts through the tortilla without compressing it. If you do not have a serrated knife, use the sharpest knife you have and use a gentle sawing motion.
Chill before cutting. I know I said this already, but it is worth repeating. Ten minutes in the fridge transforms your rolls from messy to magazine-worthy. If you are making these for a lunch box, roll them the night before and cut them in the morning. The flavors meld together overnight, and they taste even better.
Keep the rolls tight. As you roll, tuck the filling in with your fingers. A loose roll falls apart. A tight roll holds together beautifully. Think of it like rolling a sleeping bag—you want it snug but not so tight that the filling squishes out the ends.
One of my biggest failures was using a tortilla that was too dry. It cracked right down the middle as I rolled it, and cream cheese oozed out everywhere. Now I always check my tortillas for flexibility before starting. If they feel stiff, I microwave them for 5 seconds to soften them up.
Variations & Adaptations
These rolls are endlessly customizable. Here are some of my favorite variations.
Vegetarian version: Skip the turkey and use roasted red peppers, cucumber strips, and cream cheese. Add a handful of spinach leaves for color and nutrients. I make this version for my vegetarian friend Sarah, and she says it is better than the original.
Low-carb version: Use low-carb tortillas or large lettuce leaves instead of flour tortillas. Lettuce wraps are delicate, so use less filling and roll gently. I have used romaine leaves with good results—they hold together better than butter lettuce.
Breakfast version: Spread the tortilla with cream cheese, add scrambled eggs and bacon, and roll it up. Cut into pinwheels for a fun breakfast-for-lunch option. My kids beg for this version on weekends.
Spicy version: Add a thin layer of sriracha or chipotle mayo to the cream cheese before adding the turkey. Use pepper jack cheese for extra heat. This is my husband’s favorite—he adds jalapeño slices too.
Sweet version: Swap the turkey and cheese for cream cheese and strawberry jam. Roll it up, chill, and cut. These make an excellent dessert or after-school snack. I have also used Nutella and banana slices for a decadent treat.
Gluten-free version: Use gluten-free tortillas. They are more fragile, so handle them gently. Spread the cream cheese carefully to avoid tearing. The rolls will be slightly smaller but just as tasty.
I once tried a version with hummus instead of cream cheese. It was okay, but the hummus made the tortilla soggy after a few hours. Stick with cream cheese for the best texture and stability.
Serving & Storage Suggestions
These rolls are best served cold or at room temperature. They make a fantastic lunch box item because they hold up well for hours.
Serving temperature: Serve directly from the fridge or let them sit at room temperature for 10 minutes. They are delicious either way. For parties, arrange them on a platter with the cut sides facing up and garnish with fresh herbs or cherry tomatoes.
Complementary dishes: Pair these rolls with a simple side salad, fresh fruit, or veggie sticks with ranch dip. They also go well with soup—try them alongside tomato soup or chicken noodle soup for a satisfying meal. For a fun lunch box, add a small container of grapes, baby carrots, and a cookie.
Storage instructions: Store leftover rolls in an airtight container in the refrigerator for up to 3 days. Place a paper towel at the bottom of the container to absorb any moisture. Do not leave them at room temperature for more than 2 hours.
Freezer instructions: You can freeze the uncut rolls. Wrap each roll tightly in plastic wrap, then place them in a freezer bag. Freeze for up to 1 month. Thaw in the refrigerator overnight before slicing. The texture may be slightly softer after freezing, but they still taste great.
Reheating: These rolls are meant to be eaten cold, but if you prefer them warm, microwave them for 10-15 seconds. The cream cheese will soften, and the cheese may melt slightly. Do not overheat or the tortilla will become chewy.
The flavors actually develop over time. Rolls made the night before taste even better the next day. The cream cheese absorbs the flavors of the turkey and cheese, creating a more cohesive bite. I often make a batch on Sunday night for the whole week of lunches.
Nutritional Information & Benefits
These rolls are a balanced option for lunch or a snack. Here is the approximate nutritional breakdown per roll (based on 6 rolls per tortilla):
- Calories: 120-150 per roll
- Protein: 8-10 grams
- Carbohydrates: 10-12 grams
- Fat: 6-8 grams
- Fiber: 1-2 grams
Health benefits: Turkey is a lean source of protein that supports muscle health and keeps you full. Cheese provides calcium for strong bones, and cream cheese adds a small amount of vitamin A. If you use whole wheat tortillas, you get extra fiber and B vitamins.
Dietary considerations: This recipe can be made gluten-free, low-carb, or vegetarian with simple substitutions. It is naturally nut-free, making it safe for school lunch boxes. If you are watching sodium, use low-sodium turkey and reduced-fat cheese.
From a wellness perspective, these rolls are a great way to get protein and vegetables into a lunch that actually gets eaten. I love that I can sneak in cucumber or spinach without my kids noticing. It is not a health food, but it is a balanced, satisfying option that beats a packaged lunch any day.
Conclusion
These Easy Turkey and Cheese Sushi Rolls started as a mistake, but they have become one of my most requested recipes. They are proof that you do not need fancy ingredients or complicated techniques to make something special. A tortilla, some cream cheese, turkey, and cheese—that is all it takes to turn an ordinary lunch into something fun.
I love this recipe because it is forgiving. You can use whatever cheese you have, add whatever vegetables are in your fridge, and they still turn out great. It is the kind of recipe that makes you feel like a kitchen genius without any actual effort. Honestly, that is my favorite kind of recipe.
I encourage you to make these your own. Add your favorite fillings, try different spreads, and see what combinations your family loves. Maybe you will discover a version that is even better than mine. If you do, I would love to hear about it. Drop a comment below and tell me your favorite variation. And if you make these for your kids lunch box, snap a photo and share it. There is nothing better than seeing these little pinwheels bringing joy to other kitchens.
Happy rolling, friends. Your lunch box is about to get a whole lot more interesting.
Frequently Asked Questions
Can I make these rolls ahead of time?
Absolutely. You can make them the night before and store them in the refrigerator. In fact, they taste even better the next day because the flavors have time to meld. Just keep them wrapped tightly in plastic wrap until you are ready to cut and serve.
How do I prevent the rolls from getting soggy?
The cream cheese acts as a barrier that prevents moisture from soaking into the tortilla. If you add wet ingredients like cucumber or tomato, pat them dry with a paper towel first. Also, avoid leaving the rolls at room temperature for more than 2 hours.
Can I use a different type of tortilla?
Yes, you can use whole wheat, spinach, tomato, or gluten-free tortillas. Just keep in mind that flavored tortillas may have a different texture. Spinach tortillas are a bit more delicate, so handle them gently. Whole wheat tortillas are sturdier and work great.
What if I do not have cream cheese?
You can use hummus, pesto, or even a thin layer of mayonnaise as a substitute. Keep in mind that these alternatives will change the flavor and may not hold the roll together as well. Cream cheese really is the best option for stability and taste.
Are these rolls safe for school lunch boxes?
Yes, they are nut-free (unless you add nut-based ingredients) and hold up well in a lunch box. Pack them with an ice pack to keep them cold until lunchtime. They are also a great alternative to sandwiches for kids who get bored with the same old thing.
Pin This Recipe!

Easy Turkey and Cheese Sushi Rolls: Best Lunch Box Idea

These Easy Turkey and Cheese Sushi Rolls are a quick, fun, and delicious lunch box idea made with simple ingredients like tortillas, cream cheese, turkey, and cheese. Perfect for busy mornings and picky eaters, they come together in under 10 minutes and hold up beautifully for packed lunches.
- Prep Time: 10 minutes
- Cook Time: 0 minutes
- Total Time: 10 minutes (plus optional 10-15 minutes chilling)
- Yield: 4 servings (about 24-32 pinwheels) 1x
- Category: Lunch
- Cuisine: American
Ingredients
- 4 (8-inch) flour tortillas (soft taco size)
- 4 ounces cream cheese, softened
- 4–6 slices deli turkey (e.g., oven-roasted, smoked, or honey)
- 4 slices cheese (cheddar, provolone, Swiss, or mozzarella)
- Optional: thin cucumber strips, avocado slices, lettuce leaves, or bell pepper strips
Instructions
- Soften the cream cheese: Take the cream cheese out of the fridge 15-20 minutes before starting. If forgotten, microwave for 10 seconds on low power until spreadable but not melted.
- Prepare your work surface: Lay a flour tortilla flat on a cutting board. Ensure it is at room temperature; if cold, microwave for 10 seconds to warm.
- Spread the cream cheese: Using a butter knife or offset spatula, spread a thin, even layer of cream cheese over the entire surface of the tortilla, going all the way to the edges. Use about 2 tablespoons per tortilla.
- Layer the turkey: Place 1-2 slices of turkey flat on the cream cheese, overlapping slightly to cover the surface.
- Add the cheese: Lay one slice of cheese on top of the turkey. If using add-ins like cucumber or avocado, place them in a line about an inch from the edge of the tortilla.
- Roll it up tight: Starting from one edge, roll the tortilla tightly but gently, keeping the filling tucked in. Roll all the way to the end, then press gently to seal the seam.
- Wrap and chill (optional but recommended): Wrap the rolled tortilla tightly in plastic wrap, twisting the ends like a candy wrapper. Refrigerate for 10-15 minutes to firm up the cream cheese for cleaner cuts.
- Cut into pinwheels: Using a sharp serrated knife, slice the roll into 1-inch pieces using a gentle sawing motion. You should get about 6-8 pieces per tortilla.
- Arrange and serve: Place the pinwheels on a plate or in a lunch box with cut sides facing up. Add toothpicks if packing for lunch.
Notes
For best results, use room temperature cream cheese to avoid tearing the tortilla. Chilling the rolls before cutting makes cleaner slices. The cream cheese acts as a glue, so spread it all the way to the edges. Do not overstuff; stick to one layer of turkey and one slice of cheese. Use a serrated knife for cutting to avoid squishing the roll. Rolls can be made the night before and taste even better the next day.
Nutrition
- Serving Size: 6-8 pinwheels (1 rol
- Calories: 1201506
- Sugar: 12
- Sodium: 300400
- Fat: 68
- Saturated Fat: 34
- Carbohydrates: 1012
- Fiber: 12
- Protein: 810
Keywords: turkey and cheese sushi rolls, lunch box ideas, easy pinwheel sandwiches, no-cook lunch, kid-friendly lunch, turkey cream cheese rolls



