Love this? Save it for later!
Share the inspiration with your friends
There used to be a tiny bakery tucked behind a vintage bookstore on Main Street in my old neighborhood that made the most charming Halloween cookies I’ve ever seen. When they closed their doors three summers ago—the owner retired to travel the country in an RV, of all things—I honestly felt a little lost. Every October since, I’d find myself standing in the cookie aisle, staring at sad, mass-produced sugar cookies, and thinking about those perfectly decorated black cats with their little green eyes and mischievous grins. After maybe a dozen tries—some batches that looked more like swamp creatures than cats, let me tell you—I finally cracked it.
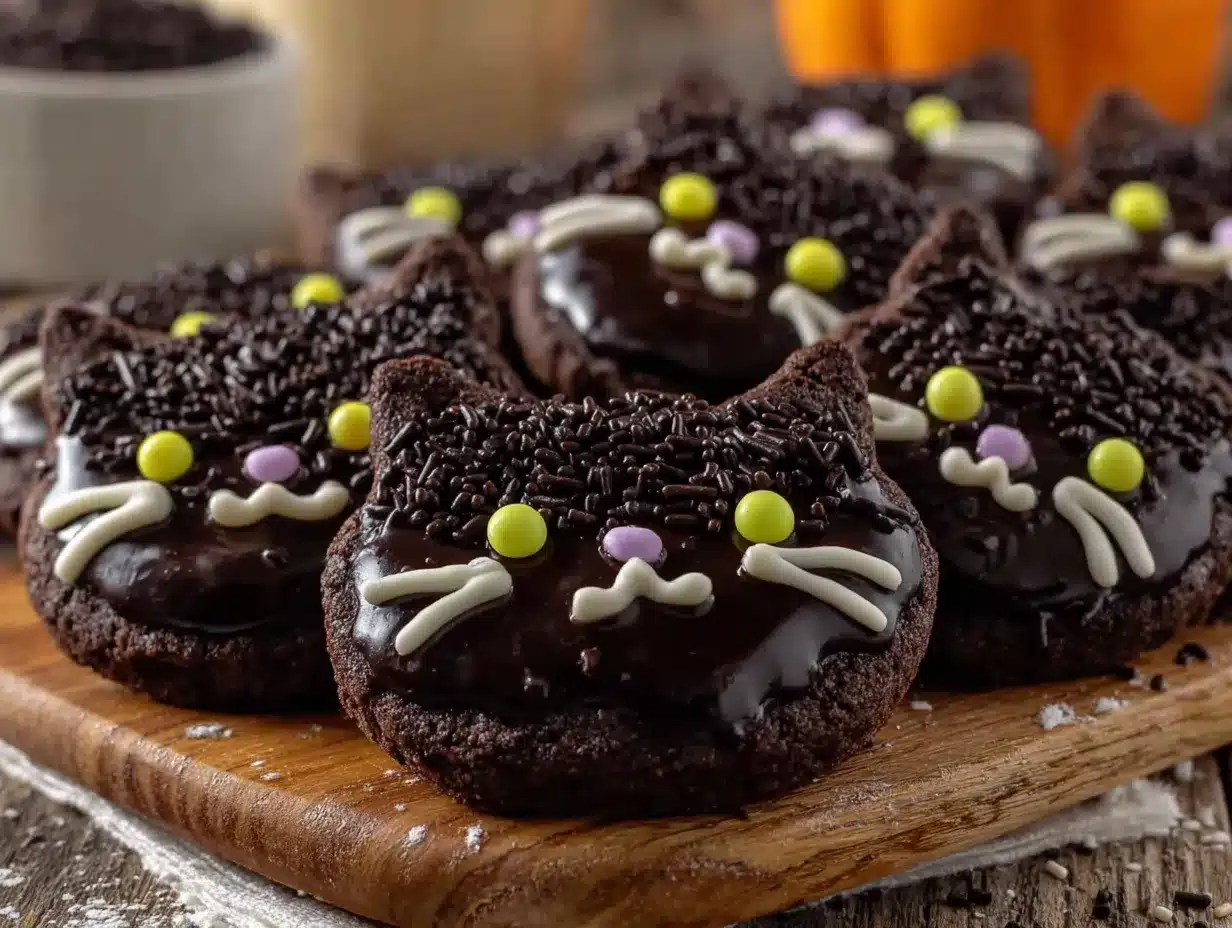
These adorable black cat sugar cookies for Halloween are my love letter to that little bakery. They’re buttery, crisp on the edges, soft in the center, and covered in the most gorgeous black royal icing that actually tastes good—not like that chalky stuff you sometimes get. The trickiest part was getting the cats to look cute instead of terrifying, and I learned that lesson the hard way. My first batch looked like they’d seen a ghost themselves. I mean, honestly, my husband took one bite and asked if they were supposed to be gremlins.
But now? These little guys have become our family’s Halloween tradition. My niece insists on naming each one before she eats it, which means we’ve had an army of black cats named Whiskers over the years. Maybe you’ve been there too—chasing a taste memory from a place that no longer exists, wondering if you’ll ever get it right. Well, this is the recipe that finally brought that bakery back to my kitchen, and I have a feeling it’s going to become your Halloween staple too.
Why You’ll Love This Recipe
Let me tell you why these black cat sugar cookies are worth every minute of decorating time. I’ve tested this recipe at least eight times—yes, I counted—and each batch taught me something new about getting that perfect cookie texture and those adorable cat faces just right.
- Perfectly Simple Ingredients: You probably have everything in your pantry right now. No weird stabilizers or hard-to-find extracts. Butter, sugar, flour, eggs—the classics that actually work.
- No Chill Dough: This might be my favorite part. You don’t have to wait for the dough to firm up before rolling. Mix, roll, cut, bake. That’s it. I hate waiting, and this recipe respects that.
- Foolproof Royal Icing: I’ve ruined more batches of royal icing than I care to admit. This version is forgiving, dries shiny, and actually tastes like vanilla instead of glue. It’s the one I wish I’d had from the start.
- Customizable Cat Personalities: Every cat can look different. Some get grumpy eyebrows, some get sleepy eyes, some look like they’re plotting world domination. That’s the fun part—no two cookies have to be identical.
- Stays Fresh for Days: These cookies hold their texture beautifully. Day one they’re crisp. Day three they’re still delicious. Day five, if they last that long, they’re still perfect for a lunchbox surprise.
What makes this recipe different from all the other sugar cookie recipes out there? It’s the texture, honestly. Most sugar cookies lean too hard into crunch or end up cakey. These strike that perfect middle ground—firm enough to hold a detailed cat shape without spreading, but tender enough that you don’t feel like you’re eating cardboard. I spent a whole afternoon adjusting the butter-to-flour ratio until the dough rolled like a dream and baked into cookies that actually look like cats, not blobs. And that royal icing? It’s thin enough to flood smoothly but thick enough to hold those little whisker details without turning into a puddle.
This recipe is the kind that makes you close your eyes after the first bite. It’s Halloween comfort food reimagined—faster, easier, and way more adorable than anything you’d buy at the store. Perfect for impressing at a Halloween party, surprising your coworkers, or just making a Tuesday in October feel special.
What Ingredients You Will Need
This recipe uses simple, wholesome ingredients that come together to create cookies with real buttery flavor and a tender crumb. Most of these are pantry staples, but I’ve included a few notes on what to look for to get the best results.
For the Sugar Cookies
- Unsalted butter, softened (1 cup / 226g) — I always use unsalted so I can control the salt level. Let it sit out for about 30 minutes until it’s soft enough to leave a fingerprint but not greasy. Land O’Lakes or Kerrygold both work beautifully here.
- Granulated sugar (1 cup / 200g) — Regular white sugar. Don’t substitute powdered sugar; it changes the spread and texture significantly.
- Large egg (1, room temperature) — Room temperature eggs incorporate more evenly into the butter-sugar mixture. If you forgot to take it out early, place the egg in a bowl of warm water for 5 minutes.
- Vanilla extract (2 teaspoons) — Pure vanilla extract makes a real difference here. I use Nielsen-Massey, but any good quality brand works. Save imitation vanilla for something else.
- All-purpose flour (2 ½ cups / 312g) — Spoon and level your flour. Scooping directly from the bag packs it down and gives you way too much flour, which means dry cookies.
- Baking powder (1 teaspoon) — Make sure it’s fresh. If your baking powder is more than six months old, test it by dropping a bit in hot water. If it doesn’t fizz, toss it.
- Salt (½ teaspoon) — Fine sea salt or table salt. Salt balances the sweetness and enhances the buttery flavor.
For the Royal Icing
- Powdered sugar (2 cups / 240g) — Sift it first. Trust me on this. Lumps in powdered sugar become lumps in your icing, and nobody wants lumpy cat whiskers.
- Meringue powder (2 tablespoons) — This is the secret to royal icing that dries hard and shiny without using raw egg whites. I use Wilton brand, and it’s available at most craft stores or online.
- Water (3-4 tablespoons) — Add slowly. The exact amount depends on humidity, so start with 3 tablespoons and add more if needed.
- Black gel food coloring (1-2 teaspoons) — Liquid food coloring won’t give you that deep, true black. You need gel. I like Americolor Super Black. It takes more than you think to get past gray, so be patient and add it gradually.
- White decorating icing (for eyes and details) — A small tube of white decorating icing with a writing tip makes the eyes and whiskers so much easier. Wilton’s white decorating icing in the squeeze tube is my go-to.
For Decoration
- Black sanding sugar (optional, for sparkle) — If you want extra shimmer, sprinkle this on the wet icing. I skip it half the time, but kids absolutely love the sparkle.
- Green candy melts (for eyes, optional) — Sometimes I use tiny green candy melts for the eyes instead of white icing. It gives the cats a more polished, almost gem-like look.
Ingredient substitution note: If you’re dairy-free, you can substitute the butter with a high-quality vegan butter stick (not the spreadable kind in a tub). I’ve had good luck with Miyoko’s European Style Cultured Vegan Butter. For a gluten-free version, use a 1:1 gluten-free baking flour blend that contains xanthan gum. Cup4Cup works really well here. The texture will be slightly different—a bit more tender—but still delicious and perfectly cat-shaped.
Equipment Needed
You don’t need a professional bakery setup for these cookies, but a few specific tools make the process much smoother. Here’s what I use:
- Cat-shaped cookie cutter (3-4 inches) — This is non-negotiable. I found my favorite one on Amazon for about eight dollars, and it’s a simple silhouette cutter that gives you a nice sitting cat shape. Avoid overly detailed cutters; simple shapes are easier to decorate.
- Rolling pin with thickness rings — I used to eyeball my dough thickness, and my cookies were always uneven. Thickness rings changed my life. Aim for ¼ inch. If you don’t have rings, use two wooden spoons or chopsticks on either side of your dough as guides.
- Baking sheets (2, light-colored) — Dark baking sheets absorb more heat and can over-brown the bottoms of your cookies. Light-colored, rimmed baking sheets give you the most even bake.
- Parchment paper or silicone baking mats — Parchment paper is cheaper and works perfectly. Silicone mats are reusable and give slightly softer bottoms. Either works.
- Piping bags or squeeze bottles — For the royal icing, I prefer small squeeze bottles I got from a craft store. They give you more control than piping bags, and they’re easier to clean. If you use piping bags, get the disposable ones and snip a very tiny tip—like the size of a pinhead.
- Small offset spatula — This helps spread the icing smoothly. A butter knife works in a pinch, but an offset spatula gives you that clean, professional finish.
- Cooling rack — Cookies need to cool completely before icing. A wire rack speeds this up and prevents soggy bottoms.
Budget-friendly tip: You don’t need to buy fancy equipment. A butter knife works for spreading, a ziploc bag with a tiny corner snipped off works for piping, and you can use the cardboard tube from a roll of wrapping paper as a makeshift rolling pin guide if you’re really in a pinch. I’ve done all of these at some point, and the cookies still turned out adorable.
Preparation Method
Alright, let’s make some cats. This recipe takes about 2 hours total, including cooling and decorating time. The actual active time is closer to 45 minutes, so plan accordingly.
- Preheat your oven to 375°F (190°C). Line two baking sheets with parchment paper or silicone mats. Position your oven racks in the upper and lower thirds of the oven so you can bake two trays at once if needed.
- Cream the butter and sugar together. In a large mixing bowl, beat the softened butter and granulated sugar together on medium speed for about 3 minutes. You want it light and fluffy—pale yellow and almost doubled in volume. Scrape down the sides of the bowl halfway through. Don’t rush this step; proper creaming gives your cookies that tender texture.
- Add the egg and vanilla. Beat in the room temperature egg and vanilla extract on low speed until just combined. The mixture might look slightly curdled at this point—that’s normal, especially if your egg was a bit cold. Don’t panic.
- Mix the dry ingredients. In a separate bowl, whisk together the flour, baking powder, and salt. Whisking aerates the flour and distributes the leavening evenly. I use a fork for this because I’m too lazy to wash an extra whisk, and it works fine.
- Combine wet and dry ingredients. Add the flour mixture to the butter mixture in two additions, mixing on low speed after each addition. Stop mixing as soon as the flour disappears. Overmixing develops gluten and makes tough cookies. The dough should be soft but not sticky—it should hold together when pressed but not cling to your fingers.
- Roll the dough immediately. Here’s where this recipe shines—no chilling needed. Lightly flour your work surface and rolling pin. Place the dough on the floured surface and roll it out to an even ¼-inch thickness. Use those thickness rings if you have them. The dough might feel a bit soft, but it should roll smoothly without sticking. If it does stick, dust a little more flour underneath.
- Cut your cat shapes. Dip your cat cookie cutter in flour before each cut to prevent sticking. Press straight down without twisting—twisting seals the edges and prevents clean shapes. Place the cut cookies on your prepared baking sheets, spacing them about 2 inches apart. Gather the scraps, gently press them together, and re-roll for more cookies. You should get about 24 cookies depending on your cutter size.
- Bake for 8-10 minutes. Bake until the edges are just barely golden. The centers should look set but not browned. I usually check at 8 minutes and rotate the trays if needed. For even baking, bake one tray at a time on the middle rack. If you bake two trays at once, swap their positions halfway through.
- Cool completely. Let the cookies rest on the baking sheet for 5 minutes—they continue to set as they cool. Then transfer them to a wire rack to cool completely. This is crucial. Warm cookies will melt your royal icing into a sticky mess. I’ve made that mistake. It’s not pretty.
- Prepare the royal icing. In a medium bowl, whisk together the powdered sugar and meringue powder. Add 3 tablespoons of water and whisk until smooth. The icing should be thick but flow slowly off the whisk—like warm honey. If it’s too thick, add water a teaspoon at a time. If it’s too thin, add more powdered sugar. Stir in the black gel food coloring a little at a time until you reach your desired shade of black. It will look gray at first, then gradually darken. Be patient.
- Decorate the cats. Transfer the black icing to a squeeze bottle or piping bag. Outline each cookie first by piping a border around the edge, then fill in the center by gently squeezing the icing and letting it flow. Use a toothpick to spread the icing into corners and pop any air bubbles. Let the black icing dry completely—this takes about 1-2 hours, depending on humidity.
- Add the faces. Once the black icing is dry and hard to the touch, use your white decorating icing to pipe two small oval eyes and a tiny pink or white nose. Add three little whiskers on each side of the face. If you want green eyes, pipe a tiny dot of green icing over the white after it dries. Let everything set for another hour before stacking or serving.
Sensory cue: When the cookies are done, your kitchen should smell like butter and vanilla with a hint of toasted sugar. The edges will be just barely kissed with gold, and the centers will look matte and set. If you gently press the top of a cookie, it should feel firm but give slightly—like a firm handshake, not a hard slab.
Cooking Tips & Techniques
I’ve made these cookies so many times that I’ve collected a few tricks that make the process smoother and the results more consistent. Here are the ones I wish someone had told me before my first attempt.
Get the dough thickness right. This is the number one mistake I see. If your dough is too thin, the cookies bake up crispy and fragile—they’ll break when you try to ice them. Too thick, and they puff up and lose their cat shape. That ¼-inch mark is your sweet spot. I actually measured it with a ruler the first few times until I trusted my eye.
Chill the cut cookies if your kitchen is warm. I said no chilling is needed, and that’s true for most kitchens. But if it’s a hot summer day or your kitchen runs warm, pop the cut cookies on their baking sheets into the fridge for 10 minutes before baking. This firms up the butter and prevents spreading. I learned this the hard way when I made a batch in July and my cats came out looking like melted puddles with ears.
Use the scribe method for royal icing consistency. The perfect royal icing should hold a line when you drizzle it from a spoon, then slowly flatten into a smooth surface within 10 seconds. If it holds its shape completely, it’s too thick. If it disappears immediately, it’s too thin. I test this by dragging a toothpick through the icing in the bowl—the line should slowly disappear after about 5 seconds.
Work in small batches when decorating. Don’t try to ice all 24 cookies at once. The icing starts to dry as you work, and you’ll end up with uneven surfaces. Ice 6 cookies at a time, let them dry, then move to the next batch. This also gives you a chance to adjust your technique after the first few.
Fix mistakes with a toothpick. If you mess up an eye or a whisker, just scrape it off with a toothpick before the icing dries. You can re-pipe right over the spot. I’ve done this more times than I can count, and the cookies always look fine in the end.
My biggest failure: I once tried to speed up the drying process by putting iced cookies in the refrigerator. The condensation from the cold made the icing weep and turn sticky. It was a disaster. Just let them dry at room temperature, even if it takes a couple of hours. Patience is the secret ingredient here.
Variations & Adaptations
These black cat sugar cookies are incredibly adaptable. Here are some of my favorite ways to switch them up, depending on the occasion or dietary needs.
Pumpkin Spice Black Cats: Add 1 teaspoon of pumpkin pie spice and ¼ cup of pumpkin puree to the dough. Reduce the butter to ¾ cup to compensate for the moisture. The cookies will be slightly softer and have that cozy fall flavor. My neighbor tried these and now refuses to make the original version. She calls them “pumpkin kitties.”
Gluten-Free Version: Substitute the all-purpose flour with a 1:1 gluten-free baking blend that contains xanthan gum. I’ve tested this with King Arthur’s Measure for Measure flour, and the results were surprisingly good. The cookies spread a tiny bit more, so I recommend chilling the cut shapes for 15 minutes before baking. They’re slightly more delicate, so handle them gently when transferring to the cooling rack.
Vegan Black Cat Cookies: Use vegan butter sticks and substitute the egg with a flax egg (1 tablespoon ground flaxseed mixed with 3 tablespoons water, let sit for 5 minutes). For the royal icing, use aquafaba (the liquid from a can of chickpeas) instead of meringue powder—3 tablespoons of aquafaba whisked with powdered sugar until stiff peaks form. The texture is slightly different, but the taste is still fantastic.
Chocolate Black Cats: Replace ¼ cup of the flour with unsweetened cocoa powder. This gives you a dark chocolate cookie that’s even more Halloween-appropriate. The cocoa adds a slight bitterness that balances the sweet icing beautifully. I made these for a Halloween party last year, and they disappeared before the regular ones.
Mini Cat Cookies: Use a smaller cat cutter (1-2 inches) and reduce the baking time to 6-7 minutes. These are perfect for cookie platters or for kids who want to eat a whole cookie without feeling guilty. They’re also easier to decorate because you can skip the detailed faces and just give them simple dot eyes.
Serving & Storage Suggestions
These cookies are at their best when served at room temperature, about an hour after the icing has fully set. The contrast between the crisp cookie and the smooth, hard icing is pure perfection.
Presentation ideas: Arrange the cats on a black or orange platter so their white eyes and whiskers pop. For a Halloween party, place them on a bed of black sanding sugar to look like they’re walking through a spooky night. I’ve also threaded them onto black licorice strings to make edible cookie necklaces for a kids’ party—they were a huge hit.
What to serve with them: A cold glass of milk is the classic pairing, but they’re also fantastic with hot apple cider or a warm pumpkin spice latte. For an adult gathering, try them with a dark stout beer or a creamy Irish cream liqueur. The sweetness of the cookie balances the bitterness of stout beautifully.
Storage instructions: Store the cookies in an airtight container at room temperature for up to 5 days. Layer them between sheets of parchment paper to prevent the icing from sticking. Do not refrigerate—the moisture in the fridge will soften the icing and make it tacky.
Freezer instructions: You can freeze the baked, un-iced cookies for up to 3 months. Place them in a single layer in a freezer-safe container with parchment between layers. When you’re ready to decorate, thaw them at room temperature for about 30 minutes, then ice as directed. The royal icing does not freeze well, so always add it after thawing.
Flavor development note: These cookies actually taste better on day two. The flavors meld together, and the texture becomes perfectly balanced. So if you’re making them for a party, bake them a day ahead and decorate them the morning of. Your future self will thank you.
Nutritional Information & Benefits
Let’s be honest—these are cookies, not health food. But here’s the nutritional breakdown per cookie (based on 24 cookies, with royal icing):
| Nutrient | Amount |
|---|---|
| Calories | 165 |
| Total Fat | 8g |
| Saturated Fat | 5g |
| Cholesterol | 25mg |
| Sodium | 75mg |
| Total Carbohydrates | 22g |
| Sugars | 14g |
| Protein | 2g |
While these aren’t exactly a health food, there are a few bright spots. The butter provides a small amount of vitamin A, and the egg contributes protein and choline. If you use the gluten-free version, you’ll add some fiber from the alternative flours. And honestly, there’s a mental health benefit to spending an afternoon making something adorable and sharing it with people you love. That counts for something, right?
Dietary considerations: These cookies contain gluten, dairy, and eggs. For allergen-friendly options, check the variations section above. The vegan version eliminates all animal products, and the gluten-free version uses alternative flours. Always check your specific ingredient labels for potential cross-contamination if you’re serving someone with severe allergies.
Conclusion
These adorable black cat sugar cookies for Halloween are everything I hoped they’d be when I started chasing that memory of the little bakery on Main Street. They’re buttery, they’re cute, and they bring a ridiculous amount of joy to everyone who sees them. I’ve watched grown adults light up like children when they spot these cats on a cookie platter. There’s something about a well-decorated black cat that just makes people smile.
I hope you give these a try, even if you’re not a confident decorator. Start simple—just black icing and white dot eyes. You’ll be surprised how cute they turn out. And if you mess up? Scrape it off and try again. Or just eat the evidence. I won’t tell anyone.
I’d love to see your black cat creations! Leave a comment below and tell me how they turned out, or share a photo on social media and tag me. Did you give your cats personalities? Did you try one of the variations? Did your kids name them all Whiskers too? Let me know—I read every comment, and nothing makes my day like seeing someone else fall in love with this recipe.
Happy Halloween, and happy baking, friend. These little guys are waiting for you.
Frequently Asked Questions
Can I make the dough ahead of time and refrigerate it?
Absolutely. While this recipe doesn’t require chilling, you can wrap the dough tightly in plastic wrap and refrigerate it for up to 3 days. Let it sit at room temperature for about 15 minutes before rolling so it’s soft enough to work with. You can also freeze the dough for up to 3 months—just thaw it overnight in the refrigerator before using.
Why did my black icing turn out gray instead of black?
This is the most common issue with black royal icing. Gel food coloring takes time to develop, and it always looks lighter when wet than it will when dry. Add the coloring gradually, stirring well after each addition, and let the icing sit for 5 minutes before checking the color. If it still looks gray after drying, add a tiny drop of purple gel coloring—it neutralizes the brown tones and gives you a truer black.
My cookies spread in the oven and lost their cat shape. What went wrong?
This usually happens for one of three reasons: your butter was too soft, your dough wasn’t thick enough, or your baking sheets were too warm. Next time, make sure your butter is softened but not greasy, roll the dough to a full ¼ inch, and let your baking sheets cool completely between batches. If your kitchen is warm, pop the cut cookies in the fridge for 10 minutes before baking.
Can I use store-bought icing instead of making royal icing from scratch?
You can, but the results won’t be the same. Store-bought icing doesn’t dry hard like royal icing, so your cookies will be sticky and prone to smudging. If you’re in a pinch, you can thin down store-bought white icing with a few drops of water and add black coloring, but it won’t have that smooth, professional finish. The homemade royal icing is worth the extra 5 minutes.
How do I get the royal icing perfectly smooth on top of the cookies?
The key is getting the consistency right and using the flooding technique. Outline the cookie first with slightly thicker icing, then fill the center with thinner icing. Use a toothpick to spread the thinner icing into the corners and pop any air bubbles. Gently tap the baking sheet on the counter to help the icing settle. Let it dry completely without moving the cookies, and you’ll get that beautiful, smooth surface every time.
Pin This Recipe!

Easy Black Cat Sugar Cookies for Halloween

Buttery, crisp-edged sugar cookies shaped like adorable black cats, decorated with smooth black royal icing and cute little faces. A nostalgic Halloween treat that’s easier than it looks and perfect for parties or family fun.
- Prep Time: 45 minutes
- Cook Time: 10 minutes
- Total Time: 2 hours (including cooling and decorating)
- Yield: 24 servings 1x
- Category: Dessert
- Cuisine: American
Ingredients
- 1 cup (226g) unsalted butter, softened
- 1 cup (200g) granulated sugar
- 1 large egg, room temperature
- 2 teaspoons vanilla extract
- 2 ½ cups (312g) all-purpose flour
- 1 teaspoon baking powder
- ½ teaspoon fine sea salt
- 2 cups (240g) powdered sugar, sifted
- 2 tablespoons meringue powder
- 3–4 tablespoons water
- 1–2 teaspoons black gel food coloring
- White decorating icing (for eyes and details)
- Black sanding sugar (optional, for sparkle)
- Green candy melts (optional, for eyes)
Instructions
- Preheat oven to 375°F (190°C). Line two baking sheets with parchment paper or silicone mats.
- In a large bowl, beat softened butter and granulated sugar on medium speed for about 3 minutes until light and fluffy.
- Beat in room temperature egg and vanilla extract on low speed until just combined.
- In a separate bowl, whisk together flour, baking powder, and salt.
- Add flour mixture to butter mixture in two additions, mixing on low until just combined. Do not overmix.
- Lightly flour work surface and rolling pin. Roll dough to an even ¼-inch thickness.
- Cut cat shapes with a floured cookie cutter. Place on prepared baking sheets, spacing 2 inches apart. Gather scraps, press together, and re-roll.
- Bake for 8-10 minutes until edges are just barely golden. Let rest on baking sheet for 5 minutes, then transfer to wire rack to cool completely.
- For royal icing: Whisk together powdered sugar and meringue powder. Add 3 tablespoons water and whisk until smooth (like warm honey). Stir in black gel food coloring gradually until desired shade.
- Transfer black icing to squeeze bottle or piping bag. Outline each cookie, then fill center. Use toothpick to spread and pop bubbles. Let dry 1-2 hours.
- Once black icing is dry, use white decorating icing to pipe two small oval eyes and a tiny nose. Add three whiskers on each side. Let set another hour before stacking or serving.
Notes
No chilling needed for dough. For best results, roll dough to exactly ¼ inch. If kitchen is warm, chill cut cookies 10 minutes before baking. Royal icing should hold a line then slowly flatten within 10 seconds. Work in small batches when decorating. Do not refrigerate iced cookies. Cookies taste even better on day two.
Nutrition
- Serving Size: 1 cookie
- Calories: 165
- Sugar: 14
- Sodium: 75
- Fat: 8
- Saturated Fat: 5
- Carbohydrates: 22
- Protein: 2
Keywords: Halloween cookies, black cat cookies, sugar cookies, royal icing cookies, Halloween dessert, easy sugar cookies, no chill cookies



