Love this? Save it for later!
Share the inspiration with your friends
It was 10:47 PM on a random Tuesday in mid-October, and I had a very specific craving for something sweet and chocolatey. Halloween was still a couple weeks away, but the candy aisle had already invaded my brain. I didn’t have fancy candy melts or a piping bag, but I had a sleeve of Oreos, a block of cream cheese, and this wild idea that maybe, just maybe, I could turn a simple truffle into something the kids would actually lose their minds over. Honestly, I was tired. The kind of tired where you’re just moving on autopilot, but something about the late hour made me brave. I started mashing cookies with my hands — no food processor, just a Ziploc bag and a rolling pin — and let me tell you, it was oddly therapeutic. The kitchen was quiet except for the crinkle of the bag and the hum of the fridge. I didn’t plan to make black cats that night. I was just making truffles. But then I looked at the clock, looked at the bowl of dark chocolate, and thought, “What if I just made them look a little spooky?” Maybe you’ve been there — that moment when a simple idea turns into something way more fun than you expected. I found a bag of candy eyes in the back of the pantry (leftover from a birthday cake disaster), and suddenly, these little truffles had personalities. My kids found them the next morning before school and literally screamed. Not a polite “oh, cool” — a real scream of joy. That’s when I knew this recipe was staying in our Halloween rotation forever. It’s not fancy. It’s not complicated. But it is exactly the kind of kitchen magic that happens when you’re too tired to overthink it.
Why You’ll Love This Recipe
Let’s be real — Halloween treats can be a total headache. Between the elaborate fondant decorations and the complicated baking projects that promise “easy” but take three hours, it’s exhausting. These Easy Black Cat Oreo Truffles are the exact opposite. They are the recipe you make when you want maximum cuteness with minimum effort.
- Kid-Friendly and Fun: This is the kind of recipe where kids can actually help. They can crush the Oreos, roll the balls, and place the candy eyes. No oven, no hot sugar, no stress.
- No-Bake and Quick: You only need about 20 minutes of active prep time. The hardest part is waiting for them to chill in the fridge. Honestly, that’s my kind of recipe.
- Simple Pantry Ingredients: Oreos, cream cheese, chocolate chips, and a few candy decorations. You probably already have most of this in your kitchen right now.
- Budget-Friendly: No expensive specialty ingredients. A standard pack of Oreos and a block of cream cheese go a long way. You can make a whole batch for under $10.
- Perfect for Halloween Parties: These little black cats are total showstoppers on a dessert table. They look impressive, but you’ll be the only one who knows how simple they really are.
- Crowd-Pleaser for All Ages: I’ve seen adults grab three of these before the kids even get a chance. The creamy, chocolatey center is irresistible.
What makes this recipe different from every other Oreo truffle out there? It’s the shape and the details. Instead of just rolling plain balls, we’re shaping them into little cat heads with pointed ears. It takes an extra 30 seconds per truffle, and the result is absolutely adorable. Plus, the coating technique I use keeps the chocolate smooth and crack-free — no tempering needed. This is the kind of treat that makes you close your eyes after the first bite. It’s creamy, crunchy, and perfectly sweet. And honestly? It makes you feel like a Halloween hero without breaking a sweat.
What Ingredients You Will Need
This recipe uses simple, wholesome ingredients to deliver bold flavor and satisfying texture without the fuss. Most of these are pantry staples, and the few extras are easy to find at any grocery store during October.
- For the Truffle Base:
- 1 standard package (14.3 oz / 405 g) Oreo cookies (regular, not Double Stuf — the classic ratio works best for texture)
- 8 oz (226 g) full-fat cream cheese, softened to room temperature (I recommend Philadelphia brand for the creamiest result)
- 1/4 teaspoon vanilla extract (optional, but adds a nice depth)
- Pinch of salt (balances the sweetness)
- For the Coating:
- 12 oz (340 g) semi-sweet or dark chocolate chips (I prefer Ghirardelli 60% cacao for a rich, not-too-sweet coating)
- 1 tablespoon coconut oil or vegetable shortening (this is my secret for a glossy, smooth finish that doesn’t crack)
- For Decoration:
- 40-50 candy eyes (the small round ones work best for these little faces)
- Black licorice strings or black shoestring licorice (cut into small pieces for whiskers — about 1/2 inch each)
- Orange or yellow candy melts (for the eyes, if you want colored irises — optional but cute)
- Small black sprinkles or mini chocolate chips (for the nose)
Ingredient Selection Tips: Look for Oreos that are fresh and snappy — stale cookies won’t crush as evenly. For the cream cheese, make sure it’s truly softened. If it’s too cold, you’ll end up with lumps in your truffle mixture. I’ve made that mistake before, and it’s fixable but annoying. You can also use reduced-fat cream cheese, but the texture will be slightly less rich. Substitution Guidance: Need a gluten-free version? Use gluten-free Oreo-style cookies (they work perfectly). Dairy-free? Use a vegan cream cheese alternative and dairy-free chocolate chips. Just note that the texture will be a bit softer, so chill them well before dipping.
Equipment Needed
You don’t need a fancy kitchen for these truffles. Here’s what you’ll actually use:
- Food processor (or a Ziploc bag and a rolling pin — I’ve done both, and honestly, the bag method is more satisfying)
- Large mixing bowl (for combining the crushed Oreos and cream cheese)
- Baking sheet lined with parchment paper or a silicone mat
- Small cookie scoop or tablespoon measure (for uniform truffle sizes)
- Microwave-safe bowl (for melting chocolate — you can also use a double boiler)
- Fork or dipping tool (for coating the truffles in chocolate)
- Toothpicks (helpful for adding the eyes and whiskers before the chocolate sets)
- Refrigerator space (the truffles need to chill at multiple stages)
If you don’t have a food processor, don’t worry. Place the Oreos in a Ziploc bag, seal it tight, and go to town with a rolling pin. It’s a great way to let kids burn off some energy. For the chocolate melting, a microwave works perfectly — just do 30-second intervals and stir between each. Budget-friendly tip: Skip the fancy dipping tools. A regular fork works fine. Just tap off the excess chocolate gently.
Preparation Method
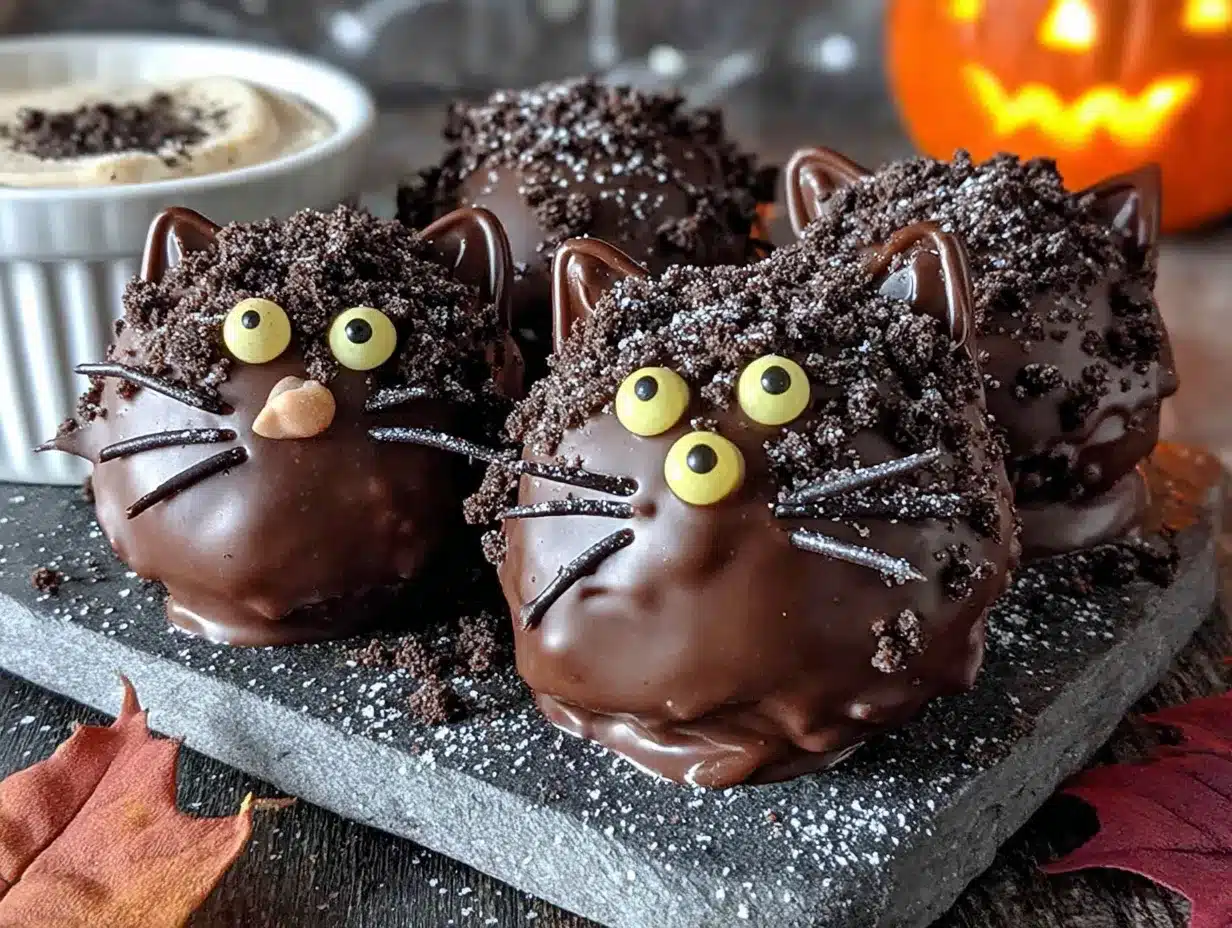
Let’s make some black cat truffles! This process is straightforward, but I’ll walk you through every step with the little tricks I’ve learned from making these about a dozen times.
- Crush the Oreos (5 minutes): Place the entire package of Oreos (filling and all) into your food processor. Pulse until you have fine crumbs that look like dark sand. If using the bag method, crush them until no large chunks remain. You want a uniform texture — this helps the truffles hold together better. Pro tip: Don’t over-process into a paste; you want crumbs, not dough.
- Mix the truffle base (3 minutes): In a large mixing bowl, combine the Oreo crumbs with the softened cream cheese, vanilla extract, and pinch of salt. Use a spatula or your hands (I prefer using my hands — it’s faster and you can feel when it’s fully combined) to mix until everything comes together into a cohesive, fudge-like dough. It should hold together when pressed. If it feels too dry, add another tablespoon of cream cheese. Too sticky? Add a few more crushed Oreos.
- Shape the truffles (10 minutes): Scoop about 1 tablespoon of the mixture and roll it into a smooth ball. Place it on the parchment-lined baking sheet. Repeat until all the mixture is used — you should get about 20-24 truffles. Now, here’s the magic part: gently pinch the top of each ball to form two little cat ears. Don’t overthink it — just a gentle pinch on each side. They don’t need to be perfect. In fact, slightly uneven ears make them cuter. Chill the shaped truffles in the refrigerator for at least 30 minutes, or until firm. This is crucial. If they’re not cold enough, they’ll fall apart in the chocolate.
- Melt the chocolate (5 minutes): In a microwave-safe bowl, combine the chocolate chips and coconut oil. Microwave in 30-second bursts, stirring thoroughly after each interval, until the chocolate is completely smooth and glossy. Be careful not to overheat — chocolate seizes up if it gets too hot. The coconut oil keeps the coating thin and shiny.
- Dip the truffles (15 minutes): Remove the chilled truffles from the fridge. Working with one at a time, drop a truffle into the melted chocolate. Use a fork to gently turn it and coat it completely. Lift it out with the fork, letting the excess chocolate drip back into the bowl. Gently tap the fork on the edge of the bowl to help the chocolate settle. Transfer the coated truffle back to the parchment paper. Repeat with the remaining truffles. Work quickly — the cold truffles will help the chocolate set fast.
- Add the faces (10 minutes): This is the fun part! While the chocolate is still wet, press two candy eyes onto each truffle. Add a small black sprinkle or mini chocolate chip for the nose. For the whiskers, gently press two or three small pieces of black licorice on each side of the nose. If the chocolate starts to set before you finish, just dab a tiny bit of melted chocolate on the back of each decoration to glue it in place. I learned this trick after my first batch lost half their faces.
- Set and serve (30 minutes): Place the finished truffles back in the refrigerator for at least 30 minutes to let the chocolate fully set. Once firm, they’re ready to serve. Store any leftovers in an airtight container in the fridge.
Cooking Tips & Techniques
I’ve made these truffles enough times to know exactly where things can go wrong. Let me save you from my own mistakes.
The Cream Cheese Temperature Trap: I cannot stress this enough — your cream cheese must be at room temperature. I once tried to speed things up by microwaving it, and it got all melty and weird. The truffle mixture was too soft to shape, and I ended up with flat, sad blobs instead of cute cat heads. Take it out of the fridge an hour before you start. Trust me on this.
The Chocolate Coating Secret: The coconut oil is not optional. It’s the difference between a dull, streaky coating and a glossy, professional-looking finish. Also, don’t skip the chilling step before dipping. Cold truffles create a thermal shock that helps the chocolate set instantly, which means less pooling at the bottom. If you notice your truffles developing a “foot” (a puddle of chocolate at the base), your chocolate is too warm. Let it cool for a minute before continuing.
Timing and Multitasking: Here’s my strategy: Make the truffle mixture and shape the cats. While they’re chilling in the fridge, clean up your workspace and melt the chocolate. That way, when the truffles are ready, you can dip and decorate without interruption. Also, set up a little assembly line — have your candy eyes, sprinkles, and licorice pieces ready in small bowls before you start dipping. Once you start, you won’t have time to search for things.
Consistency Check: If your truffle mixture feels too dry and crumbly, it means your cream cheese wasn’t soft enough or you over-crushed the Oreos. Add a splash of milk or an extra tablespoon of cream cheese to bring it together. If it’s too sticky to shape, pop it in the fridge for 15 minutes to firm up.
My Biggest Failure: The first time I made these, I forgot to add the candy eyes while the chocolate was wet. I had to glue them on with extra melted chocolate, and they looked a little drunk — all crooked and sliding off. It was honestly hilarious, and my kids loved them even more. So if your cats look a little wonky, lean into it. Imperfect cats have more personality.
Variations & Adaptations
One of the best things about this recipe is how easy it is to change up. Here are some variations I’ve tried and loved.
Dietary Adaptations:
- Gluten-Free: Use gluten-free chocolate sandwich cookies. The texture is slightly different, but they work beautifully.
- Dairy-Free/Vegan: Use vegan cream cheese and dairy-free chocolate chips. The truffles will be a bit softer, so freeze them for 15 minutes before dipping.
- Lower Sugar: Use reduced-fat Oreos and sugar-free chocolate chips. The taste is still great, just a little less sweet.
Flavor Twists:
- Mint Chocolate: Add 1/4 teaspoon peppermint extract to the truffle mixture. Use white chocolate for the coating and add green candy eyes for a spooky look.
- Peanut Butter: Swap 2 ounces of cream cheese for creamy peanut butter. The salty-sweet combo is incredible.
- Cookies and Cream: Reserve 2 tablespoons of crushed Oreos and sprinkle them on top of the wet chocolate coating for extra crunch.
Seasonal Variations:
- Christmas Cats: Use red and green candy eyes, or add a tiny red sprinkle for a Rudolph nose.
- Valentine’s Day: Shape the truffles into hearts instead of cat heads. Use pink candy melts for the coating.
- Easter: Add pastel-colored candy eyes and use white chocolate with pastel sprinkles.
Different Cooking Methods: You can also make these as truffle pops! Insert a lollipop stick into each truffle before chilling. Then dip them as usual. Kids love the popsicle format, and it makes them even easier to serve at parties. I tried this for a school Halloween party, and they were gone in five minutes.
Serving & Storage Suggestions
These truffles are best served cold, straight from the fridge. The chocolate is snappy, and the filling is firm and creamy. If you leave them out at room temperature for more than 30 minutes, they’ll start to soften, which is fine if you’re eating them quickly, but they won’t hold their shape as well.
Presentation Ideas: Arrange the black cat truffles on a platter lined with orange or black tissue paper for a festive look. For a Halloween party, place them on a bed of crushed chocolate cookies to look like dirt. You can also put each truffle in a mini cupcake liner — it makes them look more polished and keeps them from sticking together.
Complementary Dishes: These truffles pair beautifully with a tall glass of cold milk or a warm cup of coffee. For a Halloween dessert spread, serve them alongside pumpkin cupcakes, caramel apples, or a bowl of popcorn balls. They also make fantastic party favors — just pop a few in a clear cellophane bag with a twist tie.
Storage Instructions: Store the truffles in an airtight container in the refrigerator for up to 1 week. Layer them between sheets of parchment paper to prevent sticking. You can also freeze them for up to 3 months. Place them in a single layer on a baking sheet and freeze until solid, then transfer to a freezer-safe bag. Thaw in the refrigerator overnight before serving.
Reheating Tips: These are meant to be eaten cold, but if you prefer a softer center, let them sit at room temperature for 5-10 minutes before serving. Do not microwave them — the chocolate will melt and the truffles will lose their shape.
Flavor Development: Honestly, these truffles taste even better the next day. The flavors meld together overnight, and the texture becomes perfectly uniform. So don’t stress about making them a day ahead — it’s actually better that way.
Nutritional Information & Benefits
Let’s be honest — these are a treat, not a health food. But here’s what you’re looking at per truffle (based on 22 truffles):
- Calories: Approximately 180-200 calories per truffle
- Fat: 11g (mostly from cream cheese and chocolate)
- Carbohydrates: 22g
- Protein: 3g
- Sugar: 15g
Health Benefits of Key Ingredients: Dark chocolate (if you use it) is rich in antioxidants and can be good for heart health in moderation. Oreos… well, they’re a comfort food, and that has its own mental health benefits. Cream cheese provides a small amount of calcium and protein. For a Halloween treat, these are actually fairly reasonable — they’re portion-controlled and satisfying, so you’re less likely to overindulge.
Dietary Considerations: These truffles contain gluten, dairy, and soy (from the Oreos). They can be adapted to be gluten-free or dairy-free as noted in the variations section. They are nut-free if you use standard Oreos, making them a safe option for school parties with nut allergy concerns.
Personal Wellness Perspective: I believe in balance. Halloween comes once a year, and these truffles are part of the fun. I make them with my kids, we enjoy them together, and then we move on. Food should bring joy, not guilt. So go ahead, have two. You deserve it.
Conclusion
These Easy Black Cat Oreo Truffles are everything I want in a Halloween treat: adorable, delicious, and ridiculously simple to make. They prove that you don’t need fancy skills or expensive ingredients to create something that brings real joy. Whether you’re making them for a classroom party, a Halloween gathering, or just a fun afternoon with your kids, these little cats deliver every time.
I love this recipe because it’s forgiving. If your cats look a little lopsided or your whiskers are crooked, they’re still going to taste amazing. And honestly, the imperfect ones are the most charming. So don’t stress about perfection — just have fun with it. Let the kids get their hands dirty. Experiment with different decorations. Make them your own.
I’d love to see your black cat creations! Tag me in your photos or leave a comment below telling me how your family liked them. Did you try a fun variation? Did your kids come up with a new decoration idea? Share it in the comments — I read every single one. Happy Halloween, and happy snacking!
Frequently Asked Questions
Can I use Double Stuf Oreos for this recipe?
You can, but the truffle mixture will be softer and slightly sweeter because of the extra filling. If you use Double Stuf, reduce the cream cheese by about 1 ounce to compensate. I’ve tested both, and regular Oreos give a better texture for shaping.
How far in advance can I make these truffles?
You can make them up to 1 week ahead and store them in the refrigerator. They also freeze beautifully for up to 3 months. Just make sure they’re in an airtight container with parchment paper between layers. Thaw in the fridge overnight before serving.
Why did my chocolate coating crack?
Cracking usually happens when the truffles are too cold when you dip them, or if the chocolate is too thick. Make sure your truffles are chilled but not frozen solid. Also, adding a tablespoon of coconut oil or shortening to the chocolate helps keep it flexible as it sets.
Can I use white chocolate instead of dark chocolate?
Absolutely! White chocolate makes these look like ghost cats instead of black cats, which is a fun twist. Just be extra careful when melting white chocolate — it’s more sensitive to heat and can seize up easily. Use low power in the microwave and stir frequently.
How do I keep the candy eyes from falling off?
The key is to add the eyes while the chocolate coating is still wet. If the chocolate starts to set, dip the back of each candy eye in a tiny bit of melted chocolate before pressing it onto the truffle. This acts like glue. I keep a small bowl of melted chocolate nearby just for this purpose.
Pin This Recipe!

Easy Black Cat Oreo Truffles: Best Halloween Treat

These no-bake Oreo truffles are shaped into adorable black cats with candy eyes and licorice whiskers. Made with just a few simple ingredients, they’re the perfect spooky treat for Halloween parties and kid-friendly fun.
- Prep Time: 20 minutes
- Cook Time: 0 minutes
- Total Time: 1 hour 20 minutes (includes chilling time)
- Yield: 20-24 truffles 1x
- Category: Dessert
- Cuisine: American
Ingredients
- 1 standard package (14.3 oz / 405 g) Oreo cookies (regular, not Double Stuf)
- 8 oz (226 g) full-fat cream cheese, softened to room temperature
- 1/4 teaspoon vanilla extract (optional)
- Pinch of salt
- 12 oz (340 g) semi-sweet or dark chocolate chips
- 1 tablespoon coconut oil or vegetable shortening
- 40–50 candy eyes (small round ones)
- Black licorice strings or black shoestring licorice, cut into small pieces for whiskers (about 1/2 inch each)
- Orange or yellow candy melts for eyes (optional)
- Small black sprinkles or mini chocolate chips for the nose
Instructions
- Crush the Oreos: Place the entire package of Oreos (filling and all) into a food processor. Pulse until you have fine crumbs that look like dark sand. Alternatively, place Oreos in a Ziploc bag and crush with a rolling pin until no large chunks remain.
- Mix the truffle base: In a large mixing bowl, combine the Oreo crumbs with the softened cream cheese, vanilla extract, and pinch of salt. Use a spatula or your hands to mix until everything comes together into a cohesive, fudge-like dough. It should hold together when pressed.
- Shape the truffles: Scoop about 1 tablespoon of the mixture and roll it into a smooth ball. Place on a parchment-lined baking sheet. Repeat until all mixture is used (about 20-24 truffles). Gently pinch the top of each ball to form two little cat ears. Chill in the refrigerator for at least 30 minutes, or until firm.
- Melt the chocolate: In a microwave-safe bowl, combine the chocolate chips and coconut oil. Microwave in 30-second bursts, stirring thoroughly after each interval, until the chocolate is completely smooth and glossy.
- Dip the truffles: Remove chilled truffles from the fridge. Working one at a time, drop a truffle into the melted chocolate. Use a fork to gently turn and coat it completely. Lift it out, letting excess chocolate drip back into the bowl. Transfer back to the parchment paper. Repeat with remaining truffles.
- Add the faces: While the chocolate is still wet, press two candy eyes onto each truffle. Add a small black sprinkle or mini chocolate chip for the nose. Gently press two or three small pieces of black licorice on each side of the nose for whiskers. If chocolate starts to set, dab a tiny bit of melted chocolate on the back of each decoration to glue it in place.
- Set and serve: Place finished truffles back in the refrigerator for at least 30 minutes to let the chocolate fully set. Once firm, they’re ready to serve. Store leftovers in an airtight container in the fridge.
Notes
Cream cheese must be at room temperature for best texture. Coconut oil in the chocolate helps create a glossy, crack-free finish. Chill truffles well before dipping to prevent them from falling apart. Add decorations while chocolate is still wet to ensure they stick. These truffles taste even better the next day as flavors meld together.
Nutrition
- Serving Size: 1 truffle
- Calories: 190
- Sugar: 15
- Sodium: 120
- Fat: 11
- Saturated Fat: 6
- Carbohydrates: 22
- Fiber: 1
- Protein: 3
Keywords: Halloween treats, Oreo truffles, black cat truffles, no-bake dessert, easy Halloween recipe, kid-friendly Halloween treats, chocolate truffles



