Love this? Save it for later!
Share the inspiration with your friends
There used to be a tiny, windowless bakery tucked into the corner of a rainy Portland alley that made the most incredible red velvet crinkle cookies. When they closed down unexpectedly in the middle of a Tuesday, I felt like I had lost a piece of my soul. I mean, honestly, those cookies were the only thing that could make a gray, drizzling afternoon feel like a celebration. The shop didn’t even put up a “For Lease” sign; they just vanished, leaving behind nothing but the faint scent of cocoa and vanilla in the air.
I was devastated. You know that feeling when you lose your favorite coffee shop or that one perfect taco stand? It’s a specific kind of grief. For weeks, I walked past that empty space every morning on my way to work, hoping to see a new sign or a familiar face. But there was only a brick wall and a puddle of rainwater reflecting the streetlights. I tried other bakeries, of course. I bought boxes of cookies from grocery stores and even attempted to make them myself, but nothing came close. They were too dry, too cakey, or just lacked that magical, gooey heart.
After about twelve tries — and a kitchen floor that looked like a crime scene from three failed batches — I finally got it right. The secret wasn’t in the flour or the sugar, but in the chilling time and the precise balance of cream cheese. I spent nights staring at my mixing bowl, wondering why the dough wouldn’t hold its shape. Was it the humidity? Was it the brand of cocoa? I almost gave up. But then, on a whim, I added a bit more butter and let the dough rest overnight in the fridge. That’s when the magic happened.
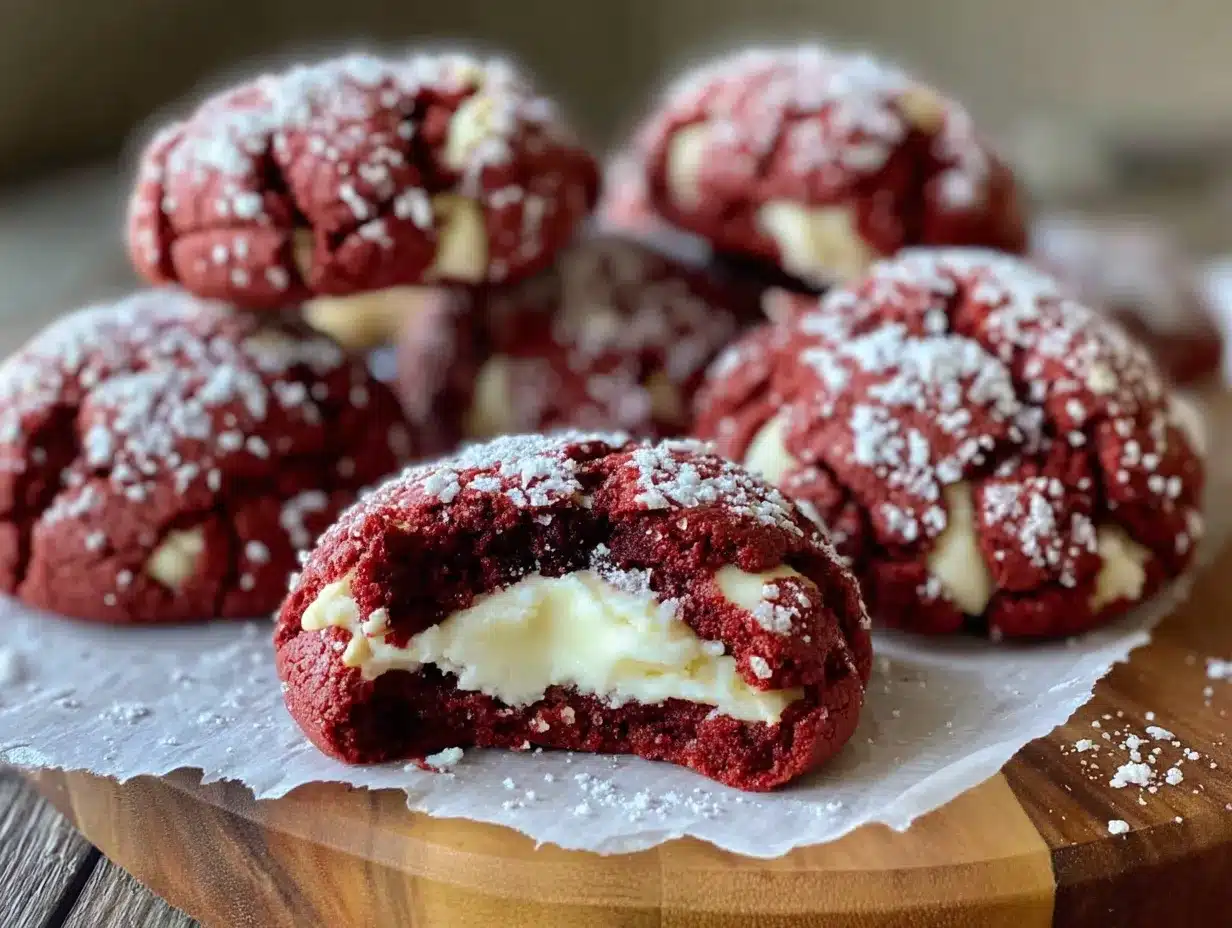
The first time I pulled them out of the oven, the scent filled my entire apartment. It smelled like comfort, like nostalgia, like that lost little bakery in Portland. I took a bite and closed my eyes. It was exactly what I had been missing. The outside was crisp and cracked, dusted with powdered sugar like fresh snow. But inside? Soft, chewy, and bursting with a warm, tangy cream cheese center. It was perfect.
I’ve been making these creamy red velvet crinkle cookies with cream cheese center ever since. They’ve become my go-to for holidays, birthday parties, and just because I need a hug in cookie form. There is something so satisfying about breaking one open and seeing that pink swirl of vanilla bean cream cheese peeking out. It’s a little piece of that lost Portland magic, recreated in my own kitchen. And honestly, it’s even better than the original because now I can make them whenever I want. Maybe you’ve been there, chasing a flavor you can’t quite find anywhere else. This recipe is my answer to that chase.
Why You’ll Love This Recipe
Let me tell you, these aren’t your average holiday cookies. I’ve tested dozens of red velvet recipes over the years, and most of them fall flat. They’re either too dry, too dense, or the cream cheese filling leaks out and makes a mess in the oven. But this one? This one is different. It’s the result of trial, error, and a whole lot of patience. I wanted to create a cookie that was tender, moist, and had that signature “crinkle” crack that makes you want to take a photo before you even eat it.
Here is why this recipe stands out from the crowd:
- Quick & Easy Prep: While the dough needs to chill, the actual mixing time is under 15 minutes. This is perfect for busy weeknights or when you need to whip up a treat for last-minute guests.
- Simple Ingredients: You likely already have most of these in your pantry. All-purpose flour, cocoa powder, butter, sugar, and cream cheese. No fancy, hard-to-find items.
- Perfect for Gifting: These cookies look incredibly professional and festive. They are ideal for Christmas gifts, office parties, or Valentine’s Day treats.
- Crowd-Pleaser: Kids love the sweetness, and adults appreciate the tangy cream cheese center. It’s a flavor profile that appeals to everyone.
- Unbelievably Delicious: The texture is a dream. Crisp edges, chewy center, and a gooey, warm surprise inside. It’s comfort food at its finest.
What makes this recipe truly special is the technique. We use a double-layer method for the dough. The outer layer is a rich, chocolatey red velvet dough that cracks beautifully. The inner layer is a sweet, tangy cream cheese filling that melts into the cookie as it bakes. This isn’t just another red velvet cookie; it’s a layered experience. The contrast between the slightly bitter cocoa and the sweet cream cheese is what keeps people coming back for more.
I remember the first time I served these to my neighbors. They were skeptical about putting cream cheese inside a cookie. But after one bite, they were asking for the recipe. It’s that kind of reaction that makes baking so rewarding. It’s not just about feeding people; it’s about creating a moment. These cookies are the kind that make you close your eyes after the first bite and smile. They are hearty enough to be a snack but sweet enough to be dessert.
What Ingredients You Will Need
This recipe relies on high-quality ingredients to deliver that bakery-style texture and flavor. You don’t need anything exotic, but the quality of your butter and cocoa powder will make a noticeable difference. Here is what you need to gather before you start baking.
For the Red Velvet Dough:
- Unsalted Butter: 1 cup (2 sticks), softened to room temperature. I recommend using a high-fat European-style butter for a richer flavor and better texture.
- Granulated Sugar: 1 ½ cups. This provides the structure and the crisp exterior.
- Brown Sugar: ½ cup, packed. This adds moisture and a hint of caramel flavor, keeping the cookies chewy.
- Eggs: 2 large eggs, room temperature. Cold eggs can cause the butter to seize, so let them sit out for 30 minutes before baking.
- Vanilla Extract: 1 tablespoon. Use pure vanilla extract, not imitation, for the best aroma.
- All-Purpose Flour: 2 ½ cups. Spoon and level your flour to avoid a dry cookie.
- Cocoa Powder: ¼ cup, unsweetened. I prefer Dutch-processed cocoa for its deep, dark color and smooth flavor.
- Baking Soda: 1 teaspoon. This helps the cookies spread and rise.
- Salt: ½ teaspoon. Enhances the chocolate flavor.
- Red Food Coloring: 1-2 teaspoons, gel-based. Gel coloring is more potent and doesn’t add extra liquid, which keeps the dough stiff.
- White Vinegar: 1 teaspoon. Reacts with the baking soda to create a tender crumb.
For the Cream Cheese Center:
- Cream Cheese: 8 oz, full-fat, softened. Do not use light cream cheese; it won’t hold its shape. I recommend Philadelphia brand for consistency.
- Powdered Sugar: ½ cup. Adds sweetness and helps thicken the filling.
- Vanilla Extract: 1 teaspoon.
- Powdered Sugar: 1 cup, for rolling the cookies. This creates the signature white “snow” effect against the red dough.
- Mixing Bowls: You’ll need two large bowls. One for the wet ingredients and one for the dry ingredients. A stainless steel bowl is ideal because it conducts heat well if you need to cool the butter.
- Electric Mixer: A hand mixer or stand mixer is highly recommended. Creaming the butter and sugar by hand takes a lot of elbow grease and time. A mixer ensures the mixture is light and fluffy, which is crucial for the cookie texture.
- Baking Sheets: Use heavy-gauge aluminum baking sheets. Thin sheets can cause the bottoms of the cookies to burn. If you only have thin sheets, double them up for extra insulation.
- Parchment Paper: Always line your baking sheets with parchment paper. This prevents sticking and makes cleanup a breeze. It also helps the cookies bake evenly.
- Cooling Rack: Essential for letting the cookies cool completely. If you leave them on the hot baking sheet, they will continue to cook and become dry.
- Silicone Spatula: For scraping down the sides of the bowl and folding in the flour. This ensures all ingredients are incorporated evenly.
- Ice Cream Scoop or Cookie Scoop: This is a game-changer for uniformity. It ensures all cookies are the same size, so they bake evenly. A 2-tablespoon scoop works perfectly for this recipe.
- Make the Cream Cheese Filling: In a medium bowl, beat the softened cream cheese, powdered sugar, and vanilla extract until smooth and creamy. This should take about 2-3 minutes. Cover the bowl with plastic wrap and refrigerate for at least 30 minutes. This step is crucial because it firms up the filling, making it easier to handle later. (Time: 5 minutes prep + 30 minutes chill)
- Cream the Butter and Sugars: In a large bowl, use an electric mixer to beat the softened unsalted butter, granulated sugar, and brown sugar until light and fluffy. This should take about 3-4 minutes. Scrape down the sides of the bowl with a spatula to ensure everything is well combined. (Time: 4 minutes)
- Add Eggs and Vanilla: Beat in the eggs one at a time, mixing well after each addition. Add the vanilla extract and mix until combined. The mixture should look creamy and pale. (Time: 2 minutes)
- Combine Dry Ingredients: In a separate medium bowl, whisk together the all-purpose flour, cocoa powder, baking soda, and salt. Make sure there are no lumps in the cocoa powder. (Time: 1 minute)
- Combine Wet and Dry: Gradually add the dry ingredients to the wet mixture, mixing on low speed until just combined. Do not overmix, or the cookies will be tough. Add the red food coloring and vinegar, and mix until the dough is a uniform red color. (Time: 2 minutes)
- Chill the Dough: Cover the dough with plastic wrap and refrigerate for at least 1 hour, or up to 24 hours. Chilling the dough prevents the cookies from spreading too much and helps them hold their shape. (Time: 1 hour minimum)
- Scoop the Filling: Once the dough has chilled, take the cream cheese filling out of the fridge. Use a small cookie scoop or your hands to form the filling into 1-inch balls. Place them on a parchment-lined baking sheet and freeze for 15 minutes. Frozen filling is much easier to wrap in dough. (Time: 15 minutes freeze)
- Scoop the Dough: Take the red velvet dough out of the fridge. Use a 2-tablespoon scoop to portion the dough into balls. Flatten each ball slightly in your palm. (Time: 10 minutes)
- Wrap the Filling: Place a frozen cream cheese ball in the center of a flattened dough ball. Carefully fold the dough over the filling, sealing it completely. Roll the dough into a smooth ball. Ensure there are no cracks or holes, or the filling will leak. (Time: 15 minutes)
- Roll in Powdered Sugar: Roll each dough ball in powdered sugar until fully coated. Place them on a parchment-lined baking sheet, leaving 2 inches of space between each cookie. (Time: 10 minutes)
- Bake: Preheat your oven to 350°F (175°C). Bake the cookies for 10-12 minutes. The cookies should be set on the edges but still soft in the center. They will continue to cook on the hot baking sheet after you remove them. (Time: 10-12 minutes)
- Cool: Let the cookies cool on the baking sheet for 5 minutes, then transfer them to a wire rack to cool completely. Dust with extra powdered sugar if desired. (Time: 5 minutes)
For the Coating:
If you are allergic to gluten, you can substitute the all-purpose flour with a 1:1 gluten-free baking flour blend. For a dairy-free option, use vegan butter and dairy-free cream cheese, though the texture may be slightly different. The key is to keep the dough cold, so if your kitchen is warm, chill the ingredients beforehand.
Equipment Needed
You don’t need a lot of fancy gadgets to make these cookies, but having the right tools will make your life easier.
If you don’t have a cookie scoop, you can use two spoons to drop dollops of dough, but the results may vary in size. Avoid using non-stick baking sheets if possible, as they can cause the cookies to spread too much. Regular aluminum sheets with parchment paper give you the best control.
Preparation Method
Let’s get into the nitty-gritty. Making these cookies is a process, but each step is straightforward. Pay attention to the details, especially the chilling steps, because they are the secret to success.
Cooking Tips & Techniques
Baking cookies might seem simple, but there are a few tricks that separate the amateurs from the pros. I’ve made plenty of mistakes in my time, and I’m here to help you avoid them.
Don’t Skip the Chill: I know it’s tempting to skip the chilling step, but please don’t. Chilling the dough solidifies the fat, which means the cookies will spread less in the oven. This helps them keep that beautiful, thick crinkle shape. If you bake warm dough, you’ll end up with flat, greasy cookies.
Use Gel Food Coloring: Liquid food coloring adds extra water to the dough, which can throw off the balance of wet and dry ingredients. Gel coloring is more concentrated and doesn’t affect the texture. If you only have liquid, use a lot more, but gel is definitely the way to go.
Freeze the Filling: Wrapping soft cream cheese filling in soft dough is a recipe for disaster. It will leak everywhere. Freezing the filling balls for 15 minutes makes them firm enough to handle. It’s a small step that makes a huge difference.
Check Your Oven Temperature: Ovens can be inaccurate. Invest in an oven thermometer to ensure your oven is actually at 350°F. If your oven runs hot, your cookies will burn on the bottom. If it runs cold, they won’t bake through.
Don’t Overbake: These cookies should look slightly underbaked when you take them out. They will finish cooking on the hot baking sheet. If you bake them until they are firm, they will be dry and crumbly. You want them soft and chewy.
Multitask Wisely: While the dough is chilling, you can prepare the cream cheese filling. Just make sure to chill the filling as well. This way, you can move quickly when it’s time to assemble the cookies.
Variations & Adaptations
While the classic red velvet with cream cheese center is my favorite, there are plenty of ways to tweak this recipe to suit your tastes.
White Chocolate Chip Variation: Add ½ cup of white chocolate chips to the red velvet dough for an extra sweet and creamy twist. The white chocolate pairs beautifully with the red color and cream cheese.
Mini Chocolate Chip Variation: For a more traditional red velvet cookie, add ½ cup of mini semi-sweet chocolate chips to the dough. The bitterness of the chocolate balances the sweetness of the sugar.
Dairy-Free Adaptation: Use vegan butter and a dairy-free cream cheese block (like Kite Hill or Miyoko’s) for the filling. Note that vegan cream cheese can be softer, so you may need to add a little more powdered sugar to thicken it. Chill the filling longer if needed.
Gluten-Free Option: Substitute the all-purpose flour with a high-quality 1:1 gluten-free baking flour blend. Add ½ teaspoon of xanthan gum if your blend doesn’t already contain it. This helps mimic the elasticity of gluten.
Flavor Twist: Add 1 teaspoon of almond extract to the cream cheese filling for a marzipan-like flavor. It’s a sophisticated twist that pairs well with the cocoa.
I tried adding orange zest to the dough once, and it was surprisingly good. The citrus brightened up the rich cocoa flavor. Feel free to experiment, but keep the ratios similar to maintain the texture.
Serving & Storage Suggestions
These cookies are best served at room temperature. Cold cookies can make the cream cheese filling firm and hard, which isn’t the desired texture. If you want a warm cookie, microwave it for 10-15 seconds. The center will become gooey and delicious.
Storage: Store the cookies in an airtight container at room temperature for up to 5 days. If your kitchen is very warm, store them in the refrigerator. Let them come to room temperature before serving.
Freezing: You can freeze the unbaked dough balls for up to 3 months. Bake them straight from the freezer, adding 1-2 minutes to the baking time. You can also freeze baked cookies for up to 2 months. Thaw them at room temperature.
Pairing: These cookies pair wonderfully with a hot cup of coffee or tea. The bitterness of the coffee or black tea complements the sweetness of the cookies. They are also great with a glass of cold milk.
Nutritional Information & Benefits
While these cookies are definitely a treat, they are made with real ingredients. Cocoa powder is rich in antioxidants, and cream cheese provides calcium and protein. However, they are still high in sugar and calories, so enjoy them in moderation. One cookie contains approximately 250 calories, 15g of fat, and 30g of carbohydrates. They are not gluten-free or dairy-free unless you use substitutions. For a healthier option, try reducing the sugar in the dough by ¼ cup, though this may affect the texture.
Conclusion
Making creamy red velvet crinkle cookies with cream cheese center is a labor of love, but the results are worth every minute. These cookies are soft, chewy, and filled with a tangy, sweet surprise. They are perfect for any occasion and sure to impress your friends and family. I hope this recipe brings you as much joy as it has brought me. If you try it, I’d love to hear how it turns out. Leave a comment below with your thoughts or share your variations. Happy baking!
FAQs
Can I use liquid food coloring instead of gel?
Yes, but you will need to use more to get a vibrant red color. Keep in mind that liquid coloring adds extra water to the dough, which can make it softer. You may need to add a little more flour if the dough becomes too sticky.
Why did my cookies spread too much?
This usually happens if the dough was not chilled long enough or if the butter was too warm. Make sure to chill the dough for at least 1 hour and use softened, not melted, butter. Also, ensure your baking sheet is cool before adding the dough balls.
Can I freeze the cream cheese filling?
Yes, you can freeze the cream cheese filling for up to 1 month. Thaw it in the refrigerator before using. It may need to be beaten again to restore its smooth texture.
What if I don’t have a cookie scoop?
You can use two spoons to drop the dough onto the baking sheet. However, the cookies may vary in size, which can lead to uneven baking. Try to make them as uniform as possible.
Can I make these cookies without a cream cheese center?
Absolutely. You can simply omit the cream cheese filling and roll the dough balls in powdered sugar. They will still be delicious, though they won’t have the gooey surprise inside.
Pin This Recipe!

Creamy Red Velvet Crinkle Cookies: Perfect Cream Cheese Center

Soft, chewy red velvet cookies with a crisp, crinkled exterior dusted in powdered sugar and a warm, tangy cream cheese center.
- Prep Time: 45 minutes
- Cook Time: 10-12 minutes
- Total Time: 55 minutes
- Yield: Approximately 24 cookies 1x
- Category: Dessert
- Cuisine: American
Ingredients
- 1 cup (2 sticks) unsalted butter, softened to room temperature
- 1 ½ cups granulated sugar
- ½ cup packed brown sugar
- 2 large eggs, room temperature
- 1 tablespoon pure vanilla extract
- 2 ½ cups all-purpose flour
- ¼ cup unsweetened cocoa powder (Dutch-processed preferred)
- 1 teaspoon baking soda
- ½ teaspoon salt
- 1–2 teaspoons red gel food coloring
- 1 teaspoon white vinegar
- 8 oz full-fat cream cheese, softened
- ½ cup powdered sugar (for filling)
- 1 teaspoon vanilla extract (for filling)
- 1 cup powdered sugar (for coating)
Instructions
- In a medium bowl, beat softened cream cheese, ½ cup powdered sugar, and 1 teaspoon vanilla extract until smooth. Cover and refrigerate for at least 30 minutes.
- In a large bowl, use an electric mixer to beat butter, granulated sugar, and brown sugar until light and fluffy (3-4 minutes). Scrape down sides.
- Beat in eggs one at a time, then add 1 tablespoon vanilla extract. Mix until combined.
- In a separate bowl, whisk together flour, cocoa powder, baking soda, and salt.
- Gradually add dry ingredients to wet mixture on low speed until just combined. Add red food coloring and vinegar; mix until uniform red color.
- Cover dough and refrigerate for at least 1 hour (or up to 24 hours).
- Remove cream cheese filling from fridge. Form into 1-inch balls and freeze for 15 minutes.
- Remove dough from fridge. Scoop 2-tablespoon portions and flatten slightly.
- Place a frozen cream cheese ball in center of flattened dough. Fold dough over filling to seal completely and roll into a smooth ball.
- Roll each dough ball in 1 cup powdered sugar until fully coated. Place on parchment-lined baking sheets, 2 inches apart.
- Preheat oven to 350°F (175°C). Bake for 10-12 minutes until edges are set but centers are soft.
- Cool on baking sheet for 5 minutes, then transfer to a wire rack to cool completely. Dust with extra powdered sugar if desired.
Notes
Chilling the dough is crucial to prevent spreading. Use gel food coloring to avoid altering dough consistency. Freeze the cream cheese filling to make it easier to wrap in dough. Do not overbake; cookies should look slightly underbaked when removed from the oven.
Nutrition
- Serving Size: 1 cookie
- Calories: 250
- Sugar: 22
- Sodium: 180
- Fat: 15
- Saturated Fat: 9
- Carbohydrates: 30
- Fiber: 1
- Protein: 3
Keywords: red velvet cookies, cream cheese center, crinkle cookies, holiday cookies, baking, dessert, cream cheese filling, red velvet



