Love this? Save it for later!
Share the inspiration with your friends
This was supposed to be a batch of classic chocolate cookies. I had the butter softening, the sugar measured, and a clear picture in my head of perfectly round, chewy chocolate drops cooling on the counter. Then my four-year-old decided to “help” by grabbing the jar of raspberry jam from the pantry and, in a moment of enthusiastic generosity, dumping a generous spoonful right into the mixing bowl. I stared at the brown batter now streaked with bright red swirls and felt that familiar knot in my stomach. The whole plan was derailed. But I was already running late for a playdate, the kitchen was a mess, and there was no way I was starting over. So I just stirred it all together, scooped the dough onto the tray, and hoped for the best.
What came out of the oven was nothing like what I had planned. The cookies spread a little too much, the jam sort of melted into the chocolate, and they looked, honestly, a bit of a mess. But the smell. Oh, that smell. It was like a fancy bakery had somehow materialized in my chaotic kitchen. My son, who had already moved on to destroying the living room, stopped mid-tantrum and asked, “What’s that, Mama?” I handed him one of the slightly ugly, jam-swirled cookies, and he took a bite. His eyes went wide. He didn’t say a word, he just grabbed two more and ran off. That was the moment I knew I had stumbled onto something special.
I spent the next week trying to recreate that happy accident, but with a little more intention. I wanted a cookie that looked as good as it tasted, something I could actually be proud to bring to a bake sale or share with the neighbors. The result is this recipe for Kid-Approved Dark Chocolate Raspberry Thumbprint Cookies. They have a rich, fudgy dark chocolate base, a perfect little well filled with sweet-tart raspberry jam, and a sprinkle of flaky sea salt that makes everything pop. They are the kind of cookie that makes you close your eyes after the first bite. Maybe you’ve been there, staring at a kitchen disaster that somehow turned into a new family favorite. This is that story, and these are those cookies. I keep making them because they remind me that sometimes the best things in life—and in the kitchen—happen when you let go of the plan.
Why You’ll Love This Recipe
These cookies aren’t just another thumbprint recipe. They are the result of a happy kitchen accident and a whole lot of testing to get them just right. I’ve made these for my family more times than I can count, and they are always, always a hit. Here is why you will love them too:
- Kid-Friendly and Fun to Make: My kids love helping me press the thumbprints into the dough. It is a tactile, messy, and incredibly satisfying job for little hands. The jam filling feels like a secret treasure inside each cookie.
- Simple, Pantry Ingredients: You likely have most of these ingredients in your kitchen right now. No fancy extracts or hard-to-find flours. Just butter, sugar, cocoa powder, flour, and a jar of good raspberry jam.
- Perfect for Busy Weeknights or Bake Sales: These cookies come together in about 30 minutes. The dough doesn’t need to chill (a major win in my book), so you can have a warm, impressive treat on the table in no time. They also travel beautifully, making them a star at school events or holiday cookie swaps.
- A Crowd-Pleaser for All Ages: The combination of rich, not-too-sweet dark chocolate and bright, fruity raspberry jam is a classic for a reason. Kids love the sweetness and the fun thumbprint, while adults appreciate the sophisticated flavor balance. I’ve never seen a plate of these last more than ten minutes.
- Unbelievably Delicious and Satisfying: The texture is the real star here. You get a slightly crisp edge, a soft and fudgy center, a burst of jammy sweetness, and a tiny crunch of sea salt. It is a symphony of textures and flavors in one perfect little bite.
What makes this recipe different from the rest? It is the foolproof method. I tested this recipe with different ratios of butter to cocoa powder, different baking times, and different ways of making the thumbprint. The secret is a slightly softer dough that you chill for just a few minutes after forming the balls, and making the indentations with the back of a round ½ teaspoon measure instead of your finger. This creates a perfect, deep well that holds the jam without overflowing. It is a small trick, but it makes all the difference between a messy cookie and a bakery-worthy one.
Honestly, this recipe is the kind that makes you feel like a hero. It is comfort food reimagined—a little bit fancy, a whole lot delicious, and totally doable on a Tuesday afternoon. Perfect for impressing guests without any stress, or for turning a simple afternoon snack into something truly memorable.
What Ingredients You Will Need
This recipe uses simple, wholesome ingredients to deliver that rich, decadent flavor and satisfying texture. No complicated shopping list here—just the good stuff. Here is everything you need:
For the Dark Chocolate Cookies
- 1 cup (2 sticks / 226g) unsalted butter, softened: This is the foundation of our cookie. Make sure it is truly softened to room temperature, not melted. If you press your finger into it, it should leave an indent without feeling greasy. I recommend using a good quality butter like Kerrygold or Land O’Lakes for the best flavor.
- ¾ cup (150g) granulated sugar: Adds sweetness and helps create that slightly crisp edge. Regular white sugar works perfectly here.
- 1 large egg yolk (room temperature): We only use the yolk for extra richness and tenderness. The white is not needed, so save it for your scrambled eggs tomorrow morning.
- 1 teaspoon pure vanilla extract: Enhances the chocolate flavor. Avoid imitation vanilla if you can—it makes a noticeable difference in the final taste.
- 1 cup (120g) all-purpose flour: Spoon and level your flour into the measuring cup. Scooping it directly can pack it down and make your cookies dry.
- ½ cup (40g) unsweetened cocoa powder: I use Dutch-processed cocoa powder for a darker, more mellow chocolate flavor. My personal favorite is Guittard or Valrhona. If you only have natural cocoa powder, it will still work, but the cookies will be a bit lighter and have a more sharp chocolate taste.
- ½ teaspoon baking powder: Helps the cookies puff up just a little bit.
- ¼ teaspoon salt: Balances the sweetness and enhances all the flavors.
For the Filling and Topping
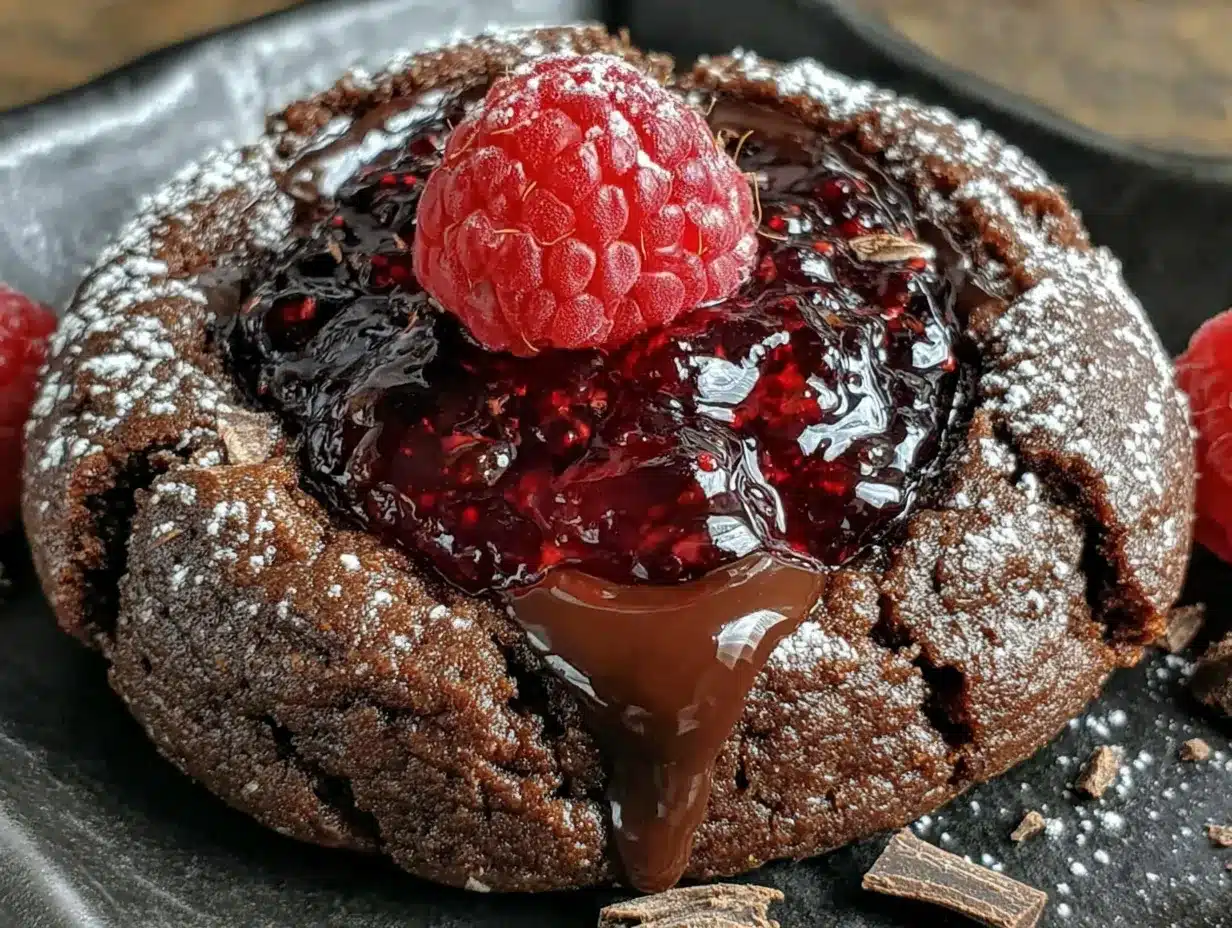
- ½ cup (160g) seedless raspberry jam: Seedless is key here for a smooth, elegant finish. My kids prefer it without the seeds. Bonne Maman is my go-to brand for a bright, authentic raspberry flavor. You can also use raspberry preserves, just make sure to stir them well first.
- Flaky sea salt (like Maldon), for sprinkling: This is non-negotiable in my house. That tiny pop of salt against the sweet jam and rich chocolate is what makes these cookies absolutely irresistible.
Substitution Guidance: If you are out of raspberry jam, strawberry or apricot jam works beautifully too. For a dairy-free version, you can use a high-quality vegan butter stick. Just make sure it is the kind that comes in a stick, not a tub, for the right consistency. If you need these to be gluten-free, swap the all-purpose flour with a good 1-to-1 gluten-free baking blend that contains xanthan gum.
Equipment Needed
You don’t need a lot of fancy tools for this recipe, which is part of its charm. Here is what you will need:
- Electric mixer (handheld or stand mixer): A hand mixer works perfectly. A stand mixer with the paddle attachment is also great. You could cream the butter and sugar by hand with a wooden spoon, but it will take some serious elbow grease.
- Mixing bowls: You will need a medium bowl for the dry ingredients and a large bowl for the cookie dough.
- Baking sheets: Two large, light-colored baking sheets are ideal. Dark baking sheets can cause the bottoms of your cookies to brown too quickly.
- Parchment paper or a silicone baking mat: This prevents sticking and makes cleanup a breeze. I prefer parchment paper for these cookies.
- ½ teaspoon measuring spoon: This is my secret weapon for making perfect thumbprints. The round back of the spoon creates a deep, uniform well that holds the jam perfectly. A regular teaspoon might be too big.
- Small cookie scoop (optional): A 1.5-tablespoon cookie scoop helps you portion the dough evenly, ensuring all your cookies are the same size and bake uniformly. It is a small investment that makes a big difference.
- Cooling rack: Essential for letting the cookies cool completely so the jam sets properly.
I’ve tried making the thumbprint with my finger, a melon baller, and even the end of a wooden spoon. The ½ teaspoon measure is, without a doubt, the best tool for the job. It is the perfect size to hold a generous dollop of jam without the cookie cracking. Trust me on this one.
Preparation Method
Follow these steps carefully, and you will have a perfect batch of cookies every single time. I’ve included all my little tricks and notes to help you avoid any pitfalls.
- Preheat and Prep: Preheat your oven to 350°F (175°C). Line two large baking sheets with parchment paper or silicone mats. This ensures the cookies don’t stick and the bottoms bake evenly.
- Cream the Butter and Sugar: In a large mixing bowl, beat the softened butter and granulated sugar together with an electric mixer on medium speed until the mixture is light, fluffy, and pale in color. This should take about 2-3 minutes. Scrape down the sides of the bowl with a rubber spatula halfway through. Do not rush this step—properly creamed butter and sugar is the key to a tender cookie.
- Add the Egg Yolk and Vanilla: Add the egg yolk and vanilla extract to the butter mixture. Beat on low speed until just combined. The mixture might look a little curdled at this point—that is totally normal. Don’t overmix.
- Whisk Dry Ingredients: In a separate medium bowl, whisk together the all-purpose flour, unsweetened cocoa powder, baking powder, and salt. Whisking aerates the mixture and ensures the baking powder and salt are evenly distributed.
- Combine Wet and Dry: Gradually add the dry ingredient mixture to the wet ingredients, mixing on low speed until just combined. You want to see no more streaks of flour. The dough will be soft and slightly sticky, but it should hold together easily when pressed. If it feels too sticky to handle, you can chill it for 10 minutes.
- Portion the Dough: Using a 1.5-tablespoon cookie scoop or your hands, roll the dough into 1-inch balls. Place them on the prepared baking sheets, spacing them about 2 inches apart. You should get about 24 cookies.
- Make the Thumbprints: This is the most important step. Take your ½ teaspoon measuring spoon and lightly dip the back of it in a little bit of flour to prevent sticking. Gently press the back of the spoon into the center of each dough ball, creating a deep, wide well. Press down until the edges of the cookie just barely start to crack. Don’t worry if they crack a little—that is part of the rustic charm. If the spoon sticks, wipe it clean and re-dip it in flour.
- Chill the Dough (Crucial Step!): Place the baking sheets with the shaped cookies in the refrigerator for 10-15 minutes. This is not optional! Chilling the dough prevents the cookies from spreading too much in the oven and helps the thumbprint hold its shape. I learned this the hard way after my first batch turned into flat, jammy puddles.
- Fill with Jam: After chilling, remove the baking sheets from the fridge. Using a small spoon or a piping bag (a ziplock bag with a tiny corner snipped off works great), carefully fill each well with about ½ teaspoon of seedless raspberry jam. Be careful not to overfill—the jam will spread a little as it bakes.
- Bake: Bake the cookies for 12-14 minutes. The edges should be set and the tops should look slightly crackled. The centers will still look a little soft—that is a good thing. They will continue to set as they cool. Do not overbake, or the cookies will be dry.
- Cool and Sprinkle: Let the cookies cool on the baking sheet for 5 minutes. This is important to allow them to firm up. Then, carefully transfer them to a wire cooling rack to cool completely. While they are still slightly warm, sprinkle a tiny pinch of flaky sea salt over the top of each cookie. The salt will stick to the warm jam.
Sensory Cue: Your kitchen will smell like a dark chocolate and raspberry dream. The cookies should look slightly matte on top, with a few tiny cracks, and the jam should be glossy and bubbling just a little around the edges.
Cooking Tips & Techniques
Over the years, I’ve made a few mistakes with these cookies so you don’t have to. Here are my best tips for perfect results every time.
- The Soft Butter Trap: I cannot stress this enough—your butter must be softened, not melted. If you microwave it and it turns into a puddle, your cookies will spread into flat, greasy discs. Plan ahead and take the butter out of the fridge 30-45 minutes before you start baking.
- Don’t Skip the Chill: I know, I know, you want cookies *now*. But that 10-minute chill in the fridge is the difference between a perfectly shaped thumbprint cookie and a jammy blob. The cold butter in the dough firms up, so it holds its shape when it hits the hot oven. I once skipped this step because I was in a hurry, and I regretted it immediately.
- The Right Tool for the Thumbprint: As I mentioned, a ½ teaspoon measuring spoon is the perfect tool. A melon baller is too big, and your thumb makes a hole that is too shallow and wide. The back of the spoon creates a deep, uniform well that holds the jam without overflowing.
- Jam Consistency Matters: If your jam is very thick and chunky, warm it up in the microwave for 10-15 seconds and stir it until it is smooth and spoonable. This makes it much easier to fill the wells without tearing the dough.
- Bake One Sheet at a Time: For the most even baking, place one baking sheet on the middle rack of your oven. If you try to bake two sheets at once, the heat won’t circulate properly, and your cookies might bake unevenly. If you must bake two, swap the sheets and rotate them halfway through the baking time.
- Timing is Everything: Start checking your cookies at the 12-minute mark. They are done when the edges are set and the tops look dry and slightly crackled. The centers will still look a little soft. Let them rest on the hot baking sheet for 5 minutes to finish setting up.
Variations & Adaptations
One of the best things about this recipe is how easy it is to change up. Here are a few of my favorite variations:
- Flavor Twist: Lemon-Blueberry: Swap the raspberry jam for a good quality blueberry jam or lemon curd. The bright, citrusy flavor is a fantastic match for the dark chocolate. I made a batch with lemon curd for a spring brunch, and they disappeared in minutes.
- Dietary Adaptation: Gluten-Free: I have made these for my gluten-sensitive friends using a 1-to-1 gluten-free baking flour blend (like Bob’s Red Mill). The cookies come out slightly more tender and crumbly, but just as delicious. Make sure to chill the dough for a full 20 minutes to help them hold their shape.
- Flavor Variation: Chocolate-Hazelnut: Instead of raspberry jam, fill the thumbprints with a dollop of Nutella or another chocolate-hazelnut spread. Omit the sea salt and add a sprinkle of chopped toasted hazelnuts on top. This is my husband’s absolute favorite version.
- Seasonal Swap: Strawberry-Rhubarb: In the spring, I love using a strawberry-rhubarb jam for a slightly tart, complex filling. The tanginess cuts through the richness of the dark chocolate beautifully.
- Allergen-Friendly: Dairy-Free: As mentioned, you can use a high-quality vegan butter stick. I have had good luck with the Miyoko’s brand. The texture will be slightly different, but the flavor is still incredible.
My personal favorite variation that I keep coming back to is the lemon-blueberry. The bright, sunny flavor feels like a little burst of happiness in the middle of a winter day. It is a simple swap that completely transforms the cookie.
Serving & Storage Suggestions
These cookies are wonderful in so many ways. Here is how to serve and store them for the best experience.
- Serving Temperature: These cookies are best enjoyed at room temperature. The jam is perfectly set, and the cookie has that ideal fudgy-chewy texture. They are also delicious slightly warm, straight from the oven, with a glass of cold milk.
- Presentation: Arrange them on a beautiful platter or a simple cake stand. A light dusting of powdered sugar (optional) or an extra sprinkle of flaky sea salt right before serving makes them look extra special. For a bake sale, I like to package them in a clear cellophane bag tied with a pretty ribbon.
- Perfect Pairings: A tall glass of cold milk is the classic pairing, and for good reason. For a grown-up treat, try them with a cup of strong black coffee or a small glass of tawny port. The bitterness of the coffee and the sweetness of the port both complement the dark chocolate and raspberry beautifully.
- Storage Instructions: Store the cooled cookies in an airtight container at room temperature. They will stay fresh and delicious for up to 5 days. I like to layer them between sheets of parchment paper to prevent them from sticking together.
- Freezing Instructions: These cookies freeze wonderfully. You can freeze the baked, cooled cookies in a single layer in a freezer-safe container for up to 3 months. To thaw, simply leave them at room temperature for about 30 minutes. You can also freeze the unbaked dough balls (before making the thumbprint) on a baking sheet, then transfer them to a freezer bag. When you are ready to bake, let them thaw in the fridge, make the thumbprints, fill with jam, and bake as directed.
- How Flavors Develop: Honestly, these cookies are even better the next day. The flavors have a chance to meld together, and the jam soaks into the cookie just a little bit, making it even more tender and flavorful. So don’t be afraid to make them a day ahead!
Nutritional Information & Benefits
While these are definitely a treat, they do have some redeeming qualities. Here is a rough estimate of the nutritional information for one cookie (based on 24 cookies).
| Nutrient | Amount per Cookie |
|---|---|
| Calories | ~140 |
| Fat | ~8g |
| Carbohydrates | ~16g |
| Sugar | ~9g |
| Protein | ~1.5g |
Health Benefits: Dark chocolate is a source of antioxidants and can be good for your heart in moderation. Raspberries are packed with fiber and Vitamin C. So while you are indulging, you are also getting a tiny dose of goodness. These cookies are also free from any artificial colors or preservatives, which makes me feel better about giving them to my kids.
Dietary Considerations: This recipe is naturally nut-free (if you skip the Nutella variation) and can be easily adapted to be gluten-free or dairy-free. The main allergen to be aware of is dairy (butter) and gluten (flour).
I believe in balance. We eat a lot of fresh vegetables and whole foods in our house, but there is always room for a homemade cookie. This is a treat that feels special without being overly indulgent.
Conclusion
These Kid-Approved Dark Chocolate Raspberry Thumbprint Cookies are more than just a recipe—they are a little story of a happy accident that turned into a beloved family tradition. They are the cookie you make when you want to feel like a baking superstar without spending hours in the kitchen. The rich, fudgy chocolate, the bright, sweet jam, and that tiny pop of salt create a flavor combination that is simply unforgettable.
I love this recipe because it is forgiving, adaptable, and always, always delivers. It is the one I turn to for school bake sales, last-minute guests, or just a quiet afternoon treat with my kids. I hope you make them your own. Try a different jam, add some chopped nuts, or just follow the recipe exactly as written. I promise you will not be disappointed.
I would love to hear how they turn out for you! Did you try a fun variation? Did your kids love helping with the thumbprints? Please leave a comment below and share your experience. And if you loved this recipe, don’t forget to pin it to your favorite baking board on Pinterest so you can find it again later. Happy baking, friend!
Frequently Asked Questions
Can I use natural cocoa powder instead of Dutch-processed?
Yes, you can. The cookies will be a bit lighter in color and have a more sharp, intense chocolate flavor. They will still be delicious, just a little different from the version made with Dutch-processed cocoa.
Why did my cookies spread too much?
The most common reason is that the butter was too soft or even melted. Make sure your butter is softened to room temperature, not warm or greasy. The second reason is skipping the chill time. That 10-15 minutes in the fridge is crucial for preventing spread.
Can I use a different type of jam?
Absolutely! Strawberry, apricot, blackberry, or even orange marmalade would all be wonderful. Just make sure to use a seedless jam for the smoothest texture, and if it is very thick, warm it up slightly so it is easy to spoon into the wells.
How do I prevent the jam from burning?
Jam can burn if the cookies are baked too long or if the oven temperature is too high. Stick to the 350°F (175°C) temperature and the 12-14 minute baking time. If you notice the jam starting to bubble over and darken too much, check your cookies a minute or two early next time.
Can I make the dough ahead of time?
Yes! You can make the dough, roll it into balls, and store it in an airtight container in the refrigerator for up to 2 days. When you are ready to bake, let the dough balls sit at room temperature for 5-10 minutes to soften slightly, then make the thumbprints, fill with jam, and bake as directed. You may need to add a minute or two to the baking time.
Pin This Recipe!

Kid-Approved Dark Chocolate Raspberry Thumbprint Cookies: Delicious & Easy

Rich, fudgy dark chocolate cookies with a sweet-tart raspberry jam filling and a sprinkle of flaky sea salt. A happy accident turned into a beloved family favorite, these cookies are easy to make and perfect for any occasion.
- Prep Time: 15 minutes
- Cook Time: 12-14 minutes
- Total Time: 30 minutes
- Yield: 24 cookies 1x
- Category: Dessert
- Cuisine: American
Ingredients
- 1 cup (2 sticks / 226g) unsalted butter, softened
- ¾ cup (150g) granulated sugar
- 1 large egg yolk (room temperature)
- 1 teaspoon pure vanilla extract
- 1 cup (120g) all-purpose flour
- ½ cup (40g) unsweetened cocoa powder (Dutch-processed preferred)
- ½ teaspoon baking powder
- ¼ teaspoon salt
- ½ cup (160g) seedless raspberry jam
- Flaky sea salt (like Maldon), for sprinkling
Instructions
- Preheat your oven to 350°F (175°C). Line two large baking sheets with parchment paper or silicone mats.
- In a large mixing bowl, beat the softened butter and granulated sugar together with an electric mixer on medium speed until light, fluffy, and pale in color, about 2-3 minutes. Scrape down the sides of the bowl halfway through.
- Add the egg yolk and vanilla extract to the butter mixture. Beat on low speed until just combined.
- In a separate medium bowl, whisk together the all-purpose flour, unsweetened cocoa powder, baking powder, and salt.
- Gradually add the dry ingredient mixture to the wet ingredients, mixing on low speed until just combined. The dough will be soft and slightly sticky.
- Using a 1.5-tablespoon cookie scoop or your hands, roll the dough into 1-inch balls. Place them on the prepared baking sheets, spacing them about 2 inches apart. You should get about 24 cookies.
- Lightly dip the back of a ½ teaspoon measuring spoon in flour. Gently press the back of the spoon into the center of each dough ball, creating a deep, wide well. Press down until the edges just barely start to crack.
- Place the baking sheets with the shaped cookies in the refrigerator for 10-15 minutes.
- After chilling, remove the baking sheets from the fridge. Using a small spoon or a piping bag, carefully fill each well with about ½ teaspoon of seedless raspberry jam.
- Bake the cookies for 12-14 minutes. The edges should be set and the tops should look slightly crackled. The centers will still look a little soft.
- Let the cookies cool on the baking sheet for 5 minutes. Then, carefully transfer them to a wire cooling rack to cool completely. While they are still slightly warm, sprinkle a tiny pinch of flaky sea salt over the top of each cookie.
Notes
For best results, use softened butter (not melted) and chill the shaped dough for 10-15 minutes before baking to prevent spreading. The ½ teaspoon measuring spoon is the perfect tool for making the thumbprint. If your jam is thick, warm it slightly for easier filling. Cookies can be stored in an airtight container at room temperature for up to 5 days, or frozen for up to 3 months.
Nutrition
- Serving Size: 1 cookie
- Calories: 140
- Sugar: 9
- Sodium: 60
- Fat: 8
- Saturated Fat: 5
- Carbohydrates: 16
- Fiber: 1
- Protein: 1.5
Keywords: thumbprint cookies, dark chocolate, raspberry, easy cookies, kid-friendly, bake sale, chocolate raspberry cookies