Love this? Save it for later!
Share the inspiration with your friends
My brother swore he hated deviled eggs. For years. Like, since we were kids at every family barbecue, he’d make a show of wrinkling his nose at the platter. “They’re just… eggy,” he’d say, with this dramatic shudder. I mean, it became a whole thing. The summer I turned thirty, I was hosting our annual Halloween potluck—the one where everyone tries to out-do each other with creepy food names and questionable gelatin molds. I was determined to bring something that actually tasted good, not just looked scary. I made a batch of my lighter version, topped them with black olive “spiders,” and set them on the table. Ten minutes later, I walked back into the kitchen to grab more napkins and caught him red-handed. He was standing at the end of the table, a half-eaten egg in one hand, already reaching for another. “These are different,” he mumbled through a mouthful, trying to look casual. “They’re not heavy.” And that, honestly, was the best compliment I could have gotten. This recipe is the one that proved him wrong—and it might just do the same for the skeptics at your party.
Why You’ll Love This Recipe
Let’s face it—traditional deviled eggs can be a bit of a gut bomb. All that mayo, the heavy yolks, the feeling like you need a nap after two. This version changes the game completely. I tested this recipe six times before I got the texture exactly right. Not too dense, not too fluffy, but that perfect creamy-yet-light consistency that makes you reach for just one more.
- Quick & Easy: Comes together in under 30 minutes, most of which is just the eggs boiling. Perfect for last-minute Halloween party prep.
- Simple Ingredients: You likely have everything in your fridge right now. No fancy grocery trips required.
- Perfect for Halloween: The spider design is genuinely fun to make and always gets a double-take from guests.
- Crowd-Pleaser: Even the “I don’t like eggs” people (yes, you know who I mean) will grab one.
- Unbelievably Delicious: The Greek yogurt swap keeps it tangy and fresh without that heavy mayo coating on your tongue.
What makes this different from every other deviled egg recipe out there? It’s the yogurt-to-mayo ratio. Most recipes go heavy on the mayo, but I found that a 60/40 split—more Greek yogurt than mayo—gives you that same richness without the grease. Plus, a tiny splash of pickle brine adds this unexpected brightness that cuts through everything. It’s the kind of appetizer that makes you close your eyes after the first bite, even with a fake spider staring back at you.
What Ingredients You Will Need
This recipe uses simple, wholesome ingredients to deliver bold flavor and satisfying texture without the fuss. Most of these are pantry staples you probably already have hanging around.
- For the eggs:
- 12 large eggs, hard-boiled and peeled
- Ice water bath (for shocking the eggs after boiling)
- For the filling:
- 1/3 cup plain Greek yogurt (I prefer Fage or Chobani for thickness—the watery brands will make your filling runny)
- 1/4 cup mayonnaise (Duke’s or Hellmann’s work best here)
- 1 teaspoon yellow mustard
- 1/2 teaspoon white vinegar (or pickle brine—honestly, I use brine more often than not)
- 1/4 teaspoon salt
- 1/8 teaspoon black pepper
- 1/8 teaspoon paprika (plus extra for garnish)
- For the spider decoration:
- 12 large black olives, pitted (you need the big ones, not the tiny canned slices)
- 1 tablespoon cream cheese (to help stick the spider legs on)
Ingredient selection tips: Look for eggs that are at least a week old—fresh eggs are actually harder to peel after boiling. I know, it sounds backwards, but it’s true. For the olives, get the jumbo pitted ones from the olive bar at the grocery store. The pre-sliced canned ones just won’t give you that spider shape. If you’re dairy-sensitive, you can swap the Greek yogurt for a dairy-free version, but honestly, the texture won’t be quite as thick. I’ve tried it with coconut yogurt, and it works, but it’s definitely not the same.
Equipment Needed
You don’t need anything fancy here. Just a few basics that you probably already own.
- Medium saucepan with lid (for boiling eggs)
- Large bowl filled with ice water
- Sharp knife and cutting board
- Small spoon or piping bag (or a zip-top bag with the corner snipped off)
- Mixing bowl
- Fork or potato masher (for breaking up the yolks)
- Small paring knife (for cutting the olive spiders—this makes a big difference)
If you don’t have a piping bag, don’t stress. I’ve used a plastic sandwich bag more times than I can count. Just spoon the filling in, twist the top, and snip a tiny corner off. Works like a charm. For the olive spiders, a paring knife is really the best tool—a regular chef’s knife is too big and you’ll end up mangling the olive legs. I learned that one the hard way, let me tell you.
Preparation Method
-
Hard-boil the eggs. Place the eggs in a single layer in your saucepan and cover them with cold water by about an inch. Bring the water to a rolling boil over high heat. Once it’s boiling, cover the pan, turn off the heat completely, and let it sit for exactly 10 minutes. Set a timer—seriously, don’t guess on this one.
-
Shock the eggs. While the eggs are sitting, fill a large bowl with ice and cold water. When the timer goes off, use a slotted spoon to transfer the eggs immediately into the ice bath. Let them chill for at least 5 minutes. This stops the cooking and makes peeling way easier.
-
Peel the eggs. Gently tap each egg on the counter to crack the shell all over, then roll it between your palms to loosen it. Start peeling from the wider end—there’s usually an air pocket there that makes it easier to get under the shell. Rinse briefly to remove any tiny shell fragments. Pat the eggs dry with a paper towel.
-
Cut the eggs. Using a sharp knife, slice each egg in half lengthwise. Carefully pop out the yolks into a medium mixing bowl. Arrange the white halves on a serving platter, cut-side up.
-
Make the filling. Mash the yolks with a fork until they’re broken up into small crumbles. Add the Greek yogurt, mayonnaise, mustard, vinegar (or brine), salt, pepper, and paprika. Stir until everything is completely combined and smooth. Taste it here—this is your moment to adjust. Need more salt? Add it now. Want more tang? Another splash of brine.
-
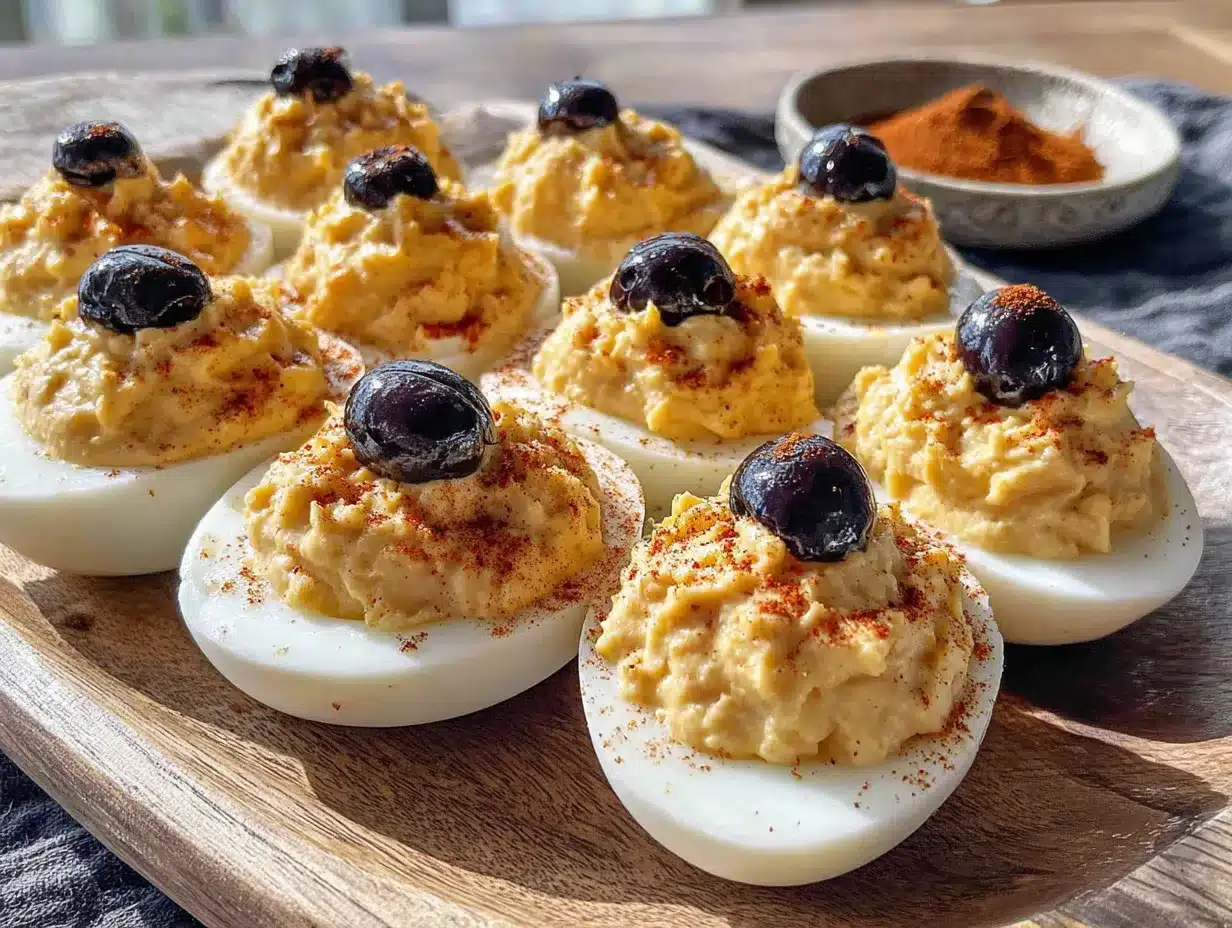
Fill the eggs. Spoon the filling into your piping bag (or zip-top bag) and snip off the corner. Pipe the filling into each egg white half, dividing it evenly. You want a nice mound that rises above the edge of the white—don’t skimp here. Sprinkle a tiny bit of extra paprika on top for color.
-
Make the spider decorations. This is the fun part. Pat the olives dry with a paper towel. Using your paring knife, cut each olive in half crosswise (not lengthwise). One half will be the spider body. Take the other half and slice it into thin strips—these are the spider legs. You should get about 4-6 thin strips per half. For each spider, take one olive half and use a tiny dab of cream cheese to attach 4 leg strips to each side. Place the spider on top of a filled egg. Repeat for all 12 eggs.
-
Chill before serving. Pop the platter in the fridge for at least 15 minutes before serving. This helps the filling set and makes the spiders stay put. They’ll keep in the fridge for up to 4 hours, but honestly, they’re best within the first hour or two.
Sensory cues: When you’re mashing the yolks, they should break apart easily—if they’re still slightly warm, they’ll mash smoother. The filling should be thick enough to hold its shape when piped, but not so stiff that it looks lumpy. If it’s too thick, add a drop more yogurt. Too thin? A tiny bit more mayo will fix it.
Cooking Tips & Techniques
Let me save you some frustration here. The first time I made these, I tried to rush the egg-peeling process and ended up with eggs that looked like they’d been in a fight. Here’s what I learned.
The age of your eggs matters. Fresh eggs are a nightmare to peel. If you can, buy your eggs a week before you plan to make these. The air pocket inside expands as eggs age, which makes the shell separate from the white more easily. I keep a carton in the back of my fridge specifically for hard-boiling.
Don’t overcook the eggs. That green ring around the yolk? That’s from cooking too long or at too high a heat. The 10-minute off-heat method I gave you above is foolproof. I’ve tested it with different stove types and pot sizes, and it works every single time.
Make the spiders ahead. You can cut the olive spiders a few hours in advance and store them in a covered container in the fridge. Just don’t put them on the eggs until right before serving, or the cream cheese can make the olive legs slide off. I learned that one when I showed up to a party with a platter of spiderless eggs and a pile of sad olive legs in a baggie.
Double the recipe. If you’re taking these to a party, make two batches. I’m not kidding. They disappear faster than you’d expect. I brought 24 to a Halloween party last year and they were gone in the first 20 minutes.
Variations & Adaptations
This recipe is pretty flexible, so don’t be afraid to make it your own.
- Spicy version: Add 1/4 teaspoon of cayenne pepper or a dash of hot sauce to the filling. The heat pairs surprisingly well with the cool, creamy texture. I made this version for a friend who adds hot sauce to everything, and she said it was “the best deviled egg of her life.” High praise.
- Herb-infused: Stir in a tablespoon of finely chopped fresh chives or dill into the filling. It adds a fresh, garden-y flavor that’s perfect for fall gatherings. I tried this with dill once on a whim and now I do it half the time.
- Bacon spider legs: For a non-vegetarian twist, use thin strips of cooked bacon instead of olive legs. Just break them into small pieces and stick them into the filling. It looks surprisingly spider-like and adds a smoky crunch.
- Dairy-free adaptation: Swap the Greek yogurt for a dairy-free yogurt alternative and use vegan cream cheese for the spider legs. The texture won’t be quite as thick, but it still tastes great. I’ve tested this with Kite Hill brand and it worked well.
Serving & Storage Suggestions
These are best served chilled, right out of the fridge. Arrange them on a platter with the spiders facing up so everyone can see the design. If you’re feeling extra festive, you can sprinkle some black sesame seeds around the platter to look like “dirt” or “spider eggs.” I did that once and it got way more attention than I expected.
Storage: Leftover deviled eggs (if you have any—honestly, I never do) can be stored in an airtight container in the refrigerator for up to 2 days. But heads up: the filling can get a little watery as it sits, and the olive spiders might start to slide off. I’d recommend eating them within 24 hours for the best texture.
Reheating: Don’t. These are meant to be served cold. If you have leftover filling and no egg whites, you can spread it on crackers for a quick snack the next day. I’ve done this more times than I care to admit.
How flavors develop: The filling actually gets better after about an hour in the fridge. The flavors meld together and the tanginess from the yogurt mellows out. If you can, make the filling a few hours ahead and pipe it into the eggs just before serving.
Nutritional Information & Benefits
Per serving (2 deviled egg halves): approximately 120 calories, 9g protein, 8g fat, 2g carbohydrates. These are estimates, obviously, since egg sizes vary and different brands of yogurt have slightly different nutritional profiles.
Health benefits: By using Greek yogurt instead of all mayo, you’re cutting the fat content significantly while bumping up the protein. Eggs are a great source of choline, which supports brain health, and the olives provide healthy monounsaturated fats. Plus, you’re getting a good dose of vitamin D and B12 from the eggs.
Dietary considerations: This recipe is naturally gluten-free and low-carb. If you’re watching your sodium, you can use low-sodium olives or skip the added salt in the filling. The olives themselves are pretty salty, so you might not need the extra pinch anyway.
Allergen note: Contains eggs and dairy. If you’re serving a crowd with allergies, make sure to label the platter clearly. I usually put a small card next to mine that says “contains eggs and dairy” just to be safe.
Conclusion
Look, I know deviled eggs are kind of a retro party food. They’re not exactly trendy or flashy. But there’s a reason they keep showing up at every gathering—they’re just plain good. This lighter version takes everything you love about the classic and makes it feel fresh again. The yogurt keeps it from being too heavy, and the spider decoration adds that Halloween fun without requiring any artistic talent.
I’d love to hear how these turn out for you. Did you add your own twist? Did the spiders stay on? Did your brother finally admit he likes deviled eggs? Drop a comment below and let me know. And if you’re looking for more Halloween appetizer ideas, you might want to check out our roasted pumpkin hummus with sage pita chips or these sweet potato skillet dip—both are huge hits at my fall parties.
Frequently Asked Questions
Can I make these a day ahead?
You can make the filling and boil the eggs up to 24 hours in advance, but I’d recommend assembling them no more than 4 hours before serving. The egg whites can get a little rubbery if they sit too long after being filled.
How do I get perfectly peeled eggs every time?
The ice bath is key. After boiling, immediately transfer the eggs to ice water and let them sit for at least 5 minutes. This shocks the shell and makes it separate from the egg white. Also, use older eggs—fresh ones are much harder to peel.
Can I use all Greek yogurt and no mayo?
You can, but the texture will be noticeably different. The mayo adds a certain richness and stability that yogurt alone can’t replicate. I’d recommend keeping at least a tablespoon of mayo in the mix for the best consistency.
What if I don’t have a piping bag?
No problem at all. A zip-top bag with the corner snipped off works perfectly. Or you can just use a small spoon to fill the eggs—it won’t look as fancy, but it’ll taste exactly the same.
Can I freeze deviled eggs?
I really wouldn’t recommend it. The texture of both the egg whites and the filling changes dramatically when frozen and thawed. They’ll turn watery and grainy. These are best made fresh and eaten within a day or two.
Pin This Recipe!
Lighter Spooky Spider Deviled Eggs (Easy Halloween Appetizer)

A lighter twist on classic deviled eggs, featuring a creamy Greek yogurt and mayo filling topped with black olive spiders. Perfect for Halloween parties, this quick and easy appetizer is both fun and delicious.
- Prep Time: 15 minutes
- Cook Time: 10 minutes
- Total Time: 25 minutes
- Yield: 24 deviled egg halves (12 servings of 2 halves each) 1x
- Category: Appetizer
- Cuisine: American
Ingredients
- 12 large eggs, hard-boiled and peeled
- Ice water bath (for shocking the eggs after boiling)
- 1/3 cup plain Greek yogurt (preferably Fage or Chobani)
- 1/4 cup mayonnaise (Duke’s or Hellmann’s)
- 1 teaspoon yellow mustard
- 1/2 teaspoon white vinegar (or pickle brine)
- 1/4 teaspoon salt
- 1/8 teaspoon black pepper
- 1/8 teaspoon paprika (plus extra for garnish)
- 12 large black olives, pitted
- 1 tablespoon cream cheese (to help stick the spider legs on)
Instructions
- Hard-boil the eggs: Place eggs in a single layer in a saucepan, cover with cold water by 1 inch. Bring to a rolling boil over high heat, then cover, turn off heat, and let sit for exactly 10 minutes.
- Shock the eggs: While eggs sit, fill a large bowl with ice and cold water. Transfer eggs immediately to ice bath and chill for at least 5 minutes.
- Peel the eggs: Gently tap each egg to crack the shell, roll between palms, and peel starting from the wider end. Rinse and pat dry.
- Cut the eggs: Slice each egg in half lengthwise. Pop out yolks into a medium bowl. Arrange whites on a serving platter, cut-side up.
- Make the filling: Mash yolks with a fork until crumbly. Add Greek yogurt, mayonnaise, mustard, vinegar (or brine), salt, pepper, and paprika. Stir until smooth. Adjust seasoning to taste.
- Fill the eggs: Spoon filling into a piping bag or zip-top bag with corner snipped off. Pipe filling into each egg white half, mounding above the edge. Sprinkle with extra paprika.
- Make the spider decorations: Pat olives dry. Cut each olive in half crosswise. One half is the spider body; slice the other half into thin strips (4-6 per half). For each spider, use a dab of cream cheese to attach 4 leg strips to each side of the olive body. Place on filled eggs.
- Chill before serving: Refrigerate platter for at least 15 minutes before serving. Best within 1-2 hours.
Notes
Use older eggs (at least a week old) for easier peeling. The filling can be made a day ahead; assemble no more than 4 hours before serving. For best texture, do not freeze. The yogurt-to-mayo ratio is 60/40 for a lighter yet creamy result.
Nutrition
- Serving Size: 2 deviled egg halves
- Calories: 120
- Sugar: 1
- Sodium: 250
- Fat: 8
- Saturated Fat: 2
- Carbohydrates: 2
- Protein: 9
Keywords: deviled eggs, Halloween appetizer, spider deviled eggs, light deviled eggs, Greek yogurt deviled eggs, easy Halloween recipe



