Love this? Save it for later!
Share the inspiration with your friends
“I never thought fruit roll-ups could be anything but sticky, store-bought nightmares until last summer,” I confessed to my neighbor, Marcy, as she handed me a thin, vibrant strip of homemade fruit goodness. It was a scorching Thursday afternoon, and I was waiting for my car to get serviced at the local shop. Marcy, who runs a little weekend farmers market stall nearby, was casually packing up when she offered me a snack. The moment I tasted that sweet, tangy strip—made from fresh berries and a hint of honey—I was hooked. Honestly, it was like biting into sunshine that had been patiently waiting in a fruit leather form.
The funny part? I had just spilled a whole smoothie all over my shirt moments before, so I was half-distracted and definitely not expecting this treat to steal the show. You know that feeling when a simple, almost forgotten snack suddenly changes your snack game forever? That was me. I asked Marcy for the recipe, and she laughed, admitting it was her mom’s secret for keeping the kids happy on hot days without resorting to sugary junk. So, I went home, bought some fresh fruit from the market, and started experimenting.
Since then, these easy homemade fruit roll-ups have become my go-to fresh snack—not only because they’re quick and naturally sweet, but because they bring back that unexpected moment of joy from an ordinary afternoon. Maybe you’ve been there too: craving something fresh, a little sweet, but also simple enough to whip up without fuss. Let me tell you, this recipe is a keeper, and I’m excited to share it with you!
Why You’ll Love This Recipe
This easy homemade fruit roll-ups recipe is honestly a total game-changer for anyone who loves a fresh, healthy snack but hates the processed stuff. Over the years, I’ve tested a bunch of fruit leather recipes, tweaking them until they felt just right—never too sticky, always bursting with natural flavor.
- Quick & Easy: Comes together in just about 30 minutes, plus drying time. Perfect for busy afternoons or last-minute snack cravings.
- Simple Ingredients: Uses fresh, wholesome fruit and a touch of natural sweetener—no artificial additives or preservatives.
- Perfect for On-the-Go: Great for school lunches, hiking trips, or a midday energy boost without the guilt.
- Crowd-Pleaser: Kids love them, adults love them, and they’re a fantastic alternative to sugary snacks.
- Unbelievably Delicious: The texture is just right—soft but chewy, with a vibrant fruit flavor that feels like summer in every bite.
What makes this recipe different? Honestly, it’s the balance between simple preparation and a texture that isn’t too tough or overly sticky. I use a low-temperature oven drying technique that locks in flavor without drying the roll-ups out completely. Plus, I added a pinch of lemon juice to brighten the fruit’s natural sweetness, inspired by a trick I picked up from a local jam maker. This recipe isn’t just a fruit roll-up—it’s a fresh snack experience that I keep coming back to, and I think you will too.
What Ingredients You Will Need
This recipe uses simple, wholesome ingredients to deliver bold flavor and satisfying texture without the fuss. You likely have most of these in your kitchen already, and if not, they’re easy to find at any grocery store or farmers market.
- Fresh Fruit: 3 cups of your favorite fruit, chopped (I recommend strawberries, mango, or a berry mix for the best flavor and natural sweetness)
- Honey or Maple Syrup: 1-2 tablespoons (optional, for a touch of extra sweetness; I personally like honey from local beekeepers for the richness)
- Lemon Juice: 1 tablespoon (freshly squeezed to enhance the fruit’s brightness and help preserve color)
- Vanilla Extract: ½ teaspoon (optional, adds a subtle warm note that complements most fruits)
- Salt: A pinch (balances the sweetness and deepens the flavor)
Substitution tips: You can swap honey with agave syrup if you prefer vegan options. For a tart twist, add a few drops of orange blossom water instead of vanilla. Frozen fruit can work too—just thaw and drain any excess liquid before blending.
Equipment Needed
- Blender or Food Processor: Essential for pureeing the fruit into a smooth base. I’ve used both, but a high-speed blender like a Vitamix makes the texture silky smooth.
- Baking Sheet: A rimmed sheet works best to prevent spills during drying.
- Parchment Paper or Silicone Baking Mat: To line the baking sheet and prevent sticking. I prefer silicone mats for easy peeling and reusability.
- Spatula: To evenly spread the fruit puree over the sheet.
- Oven or Food Dehydrator: An oven set to low heat works well, but if you have a dehydrator, that’s even better for consistent drying.
If you don’t have a food processor, a sturdy blender will do just fine. For spreading, I sometimes use an offset spatula for better control. And a note on maintenance: regularly wash your silicone mats with warm soapy water to keep them non-stick and fresh for the next batch.
Preparation Method

- Preheat your oven to 170°F (75°C) or the lowest possible setting. This slow, gentle heat is crucial to drying the fruit without cooking it.
- Prepare the baking sheet: Line it with parchment paper or a silicone baking mat. This prevents sticking and helps you peel off the roll-ups easily later.
- Puree the fruit: Place the chopped fruit into your blender or food processor. Add the honey or maple syrup, lemon juice, vanilla extract, and a pinch of salt. Blend until completely smooth—no chunks! This usually takes about 1-2 minutes.
- Spread the puree: Pour the fruit mixture onto the lined baking sheet. Use a spatula to spread it evenly, about 1/8 inch (3 mm) thick. Try to keep the edges neat, but don’t stress if it’s a bit uneven—that just adds character!
- Dry the fruit: Place the baking sheet in the oven and let it dry for 4-6 hours. Check after 4 hours—the edges should lift easily, and the surface will feel tacky but not wet. If it’s still sticky, leave it longer. (Pro tip: I sometimes leave the oven door slightly ajar with a wooden spoon to help moisture escape faster.)
- Cool and cut: Once dried, let the fruit leather cool completely. Then peel it off the parchment or mat and use kitchen scissors or a pizza cutter to slice into strips.
- Store: Roll each strip up in parchment paper and keep in an airtight container at room temperature. They’ll last about 1 to 2 weeks.
Note: If you notice any spots getting too crispy or browned, lower the oven temperature slightly next time or check earlier. You want a flexible leather, not brittle candy.
Cooking Tips & Techniques
Making fruit roll-ups might seem straightforward, but a few insider tips can save you from common pitfalls. First, patience is key. Rushing the drying process by upping the oven temperature often leads to burnt edges and a tough texture.
Another tip: blending the fruit until super smooth really makes a difference. I once tried a chunkier puree, and while it tasted great, it made rolling up the strips a nightmare. So, take the extra minute to get it silky.
Keep in mind that fruits with high water content, like watermelon, might need longer drying times or even a thickening agent like a small spoonful of chia seeds (which gel up as they soak). Also, lemon juice isn’t just for flavor; it’s a natural preservative that helps keep the color bright and the roll-ups fresh longer.
When spreading the puree, try not to make it too thick or thin. Thin layers dry faster but can tear easily, while thick layers take forever to dry and might stay sticky inside. I learned this the hard way after a failed batch that took almost 8 hours and still wasn’t quite right.
Finally, if multitasking while drying, set a timer to check every hour after the 3-hour mark. This way, you can avoid over-drying and keep the texture perfect.
Variations & Adaptations
This recipe is wonderfully flexible. Here are some ideas I’ve tried or thought would be fun to experiment with:
- Dietary Variation: Use unsweetened applesauce as a base for a naturally sweet and allergy-friendly option. It’s great if you want to skip added sweeteners.
- Seasonal Twist: Swap in fresh peaches or nectarines in summer, or pomegranate seeds and cranberries in fall for a festive flavor.
- Flavor Boost: Add a teaspoon of cinnamon or a sprinkle of chili powder for a sweet-spicy kick. I did this once for a fall-themed batch and it was a hit!
- Cooking Method Adjustment: If you have a food dehydrator, use it at 135°F (57°C) for 6-8 hours for a more even dry and softer texture.
- Allergen-Friendly: This is naturally gluten-free and vegan if you skip honey. For a nutty flavor, you could try a thin layer of almond butter on the back after drying.
Serving & Storage Suggestions
These fruit roll-ups are perfect served at room temperature but also delightful chilled on a hot day. They make a colorful, fun addition to lunchboxes or a handy snack during hikes. I sometimes pair them with a handful of nuts or a cheese stick for a balanced mini-meal.
For storage, roll each strip in parchment paper or wax paper to keep them from sticking together. Then place them in an airtight container or zip-top bag. They’ll keep well at room temperature for up to two weeks, or you can freeze them for longer storage—just thaw at room temperature before enjoying.
Reheating isn’t really necessary, but if your roll-ups get too stiff, a few seconds in a warm oven (below 150°F / 65°C) or a quick zap in the microwave can soften them back up. Just beware of overheating, which can make them overly sticky or dry.
One cool thing I’ve noticed: the flavors deepen a little if you let them sit sealed for a day or two—like a mini fruit leather aging process. So, making batches ahead can actually improve the taste.
Nutritional Information & Benefits
These easy homemade fruit roll-ups are a wholesome snack option packed with vitamins and fiber from fresh fruit. A typical serving (about one strip) contains roughly:
| Nutrient | Amount |
|---|---|
| Calories | 60-80 kcal |
| Carbohydrates | 15-18 g |
| Fiber | 2-3 g |
| Sugars (natural) | 12-14 g |
| Fat | 0 g |
| Protein | 0-1 g |
Because this recipe uses fresh fruit and minimal added sweeteners, it’s naturally gluten-free, low-fat, and vegan-friendly if you skip honey. The fiber content supports digestion, and the vitamin C from lemon juice and berries helps keep your immune system happy. From a wellness perspective, this snack feels indulgent but is genuinely nourishing, making it a great choice for mindful eating.
Conclusion
So, why try these easy homemade fruit roll-ups? Because they’re a simple way to enjoy a fresh, sweet snack that feels homemade and wholesome without the fuss or preservatives. Whether you’re packing lunches, need a quick treat after school, or want something tasty for a road trip, this recipe fits the bill.
I love this recipe because it reminds me of that unexpected afternoon with Marcy, and every time I make a batch, I’m reminded that the best snacks don’t have to be complicated. Feel free to tweak flavors or fruit combinations to suit your taste—you might end up with your own favorite version like I did.
If you try making your own fruit roll-ups, I’d love to hear how they turned out or what creative twists you added. Drop a comment below and share your experience—it’s always a joy to swap ideas about fresh snacks that bring a little sunshine to our day. Happy rolling!
Frequently Asked Questions
Can I use frozen fruit for fruit roll-ups?
Yes, you can use frozen fruit. Just thaw it completely and drain any excess liquid before blending to avoid overly wet puree and longer drying times.
How long do homemade fruit roll-ups last?
Stored in an airtight container at room temperature, they last about 1 to 2 weeks. You can also freeze them for several months.
What if my fruit roll-ups are too sticky?
Sticky roll-ups usually mean they need more drying time or the oven was too hot. Try drying longer at a lower temperature next time.
Can I make fruit roll-ups without added sweeteners?
Absolutely! Many fruits like mango or ripe strawberries are naturally sweet enough to skip extra sweeteners completely.
Is there a way to make fruit roll-ups thicker or chewier?
Spreading a slightly thicker layer will result in chewier roll-ups, but remember it will take longer to dry fully. Adding a small amount of chia seeds can also thicken the puree and add a bit of chewiness.
For those who enjoy recipes with a bit of a twist, you might also appreciate trying my crispy garlic chicken for a savory snack or exploring the fresh flavors of summer berry salad for a light dessert option.
Pin This Recipe!
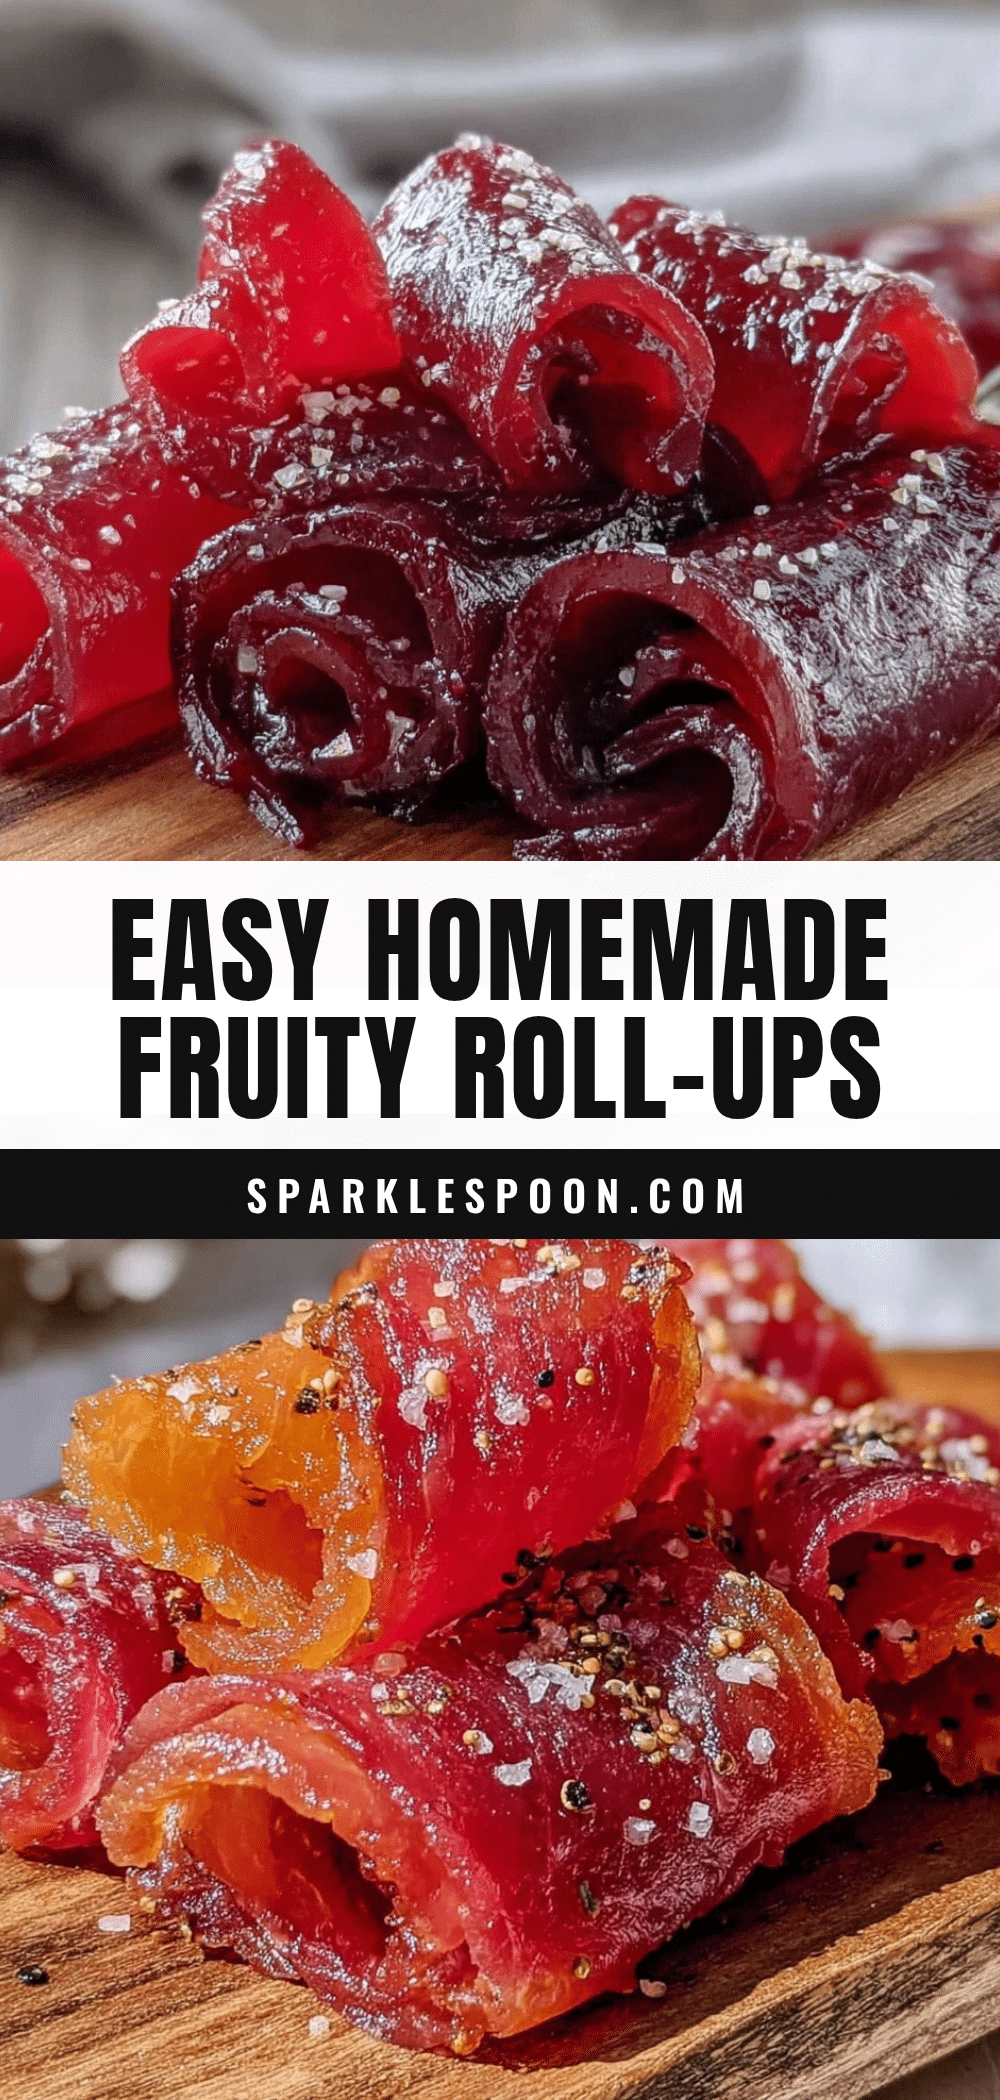
Easy Homemade Fruit Roll-Ups

A quick and healthy recipe for homemade fruit roll-ups using fresh fruit and natural sweeteners, perfect for a fresh snack anytime.
- Prep Time: 10 minutes
- Cook Time: 4-6 hours
- Total Time: 4 hours 10 minutes to 6 hours 10 minutes
- Yield: 8-10 strips 1x
- Category: Snack
- Cuisine: American
Ingredients
- 3 cups fresh fruit, chopped (strawberries, mango, or berry mix recommended)
- 1–2 tablespoons honey or maple syrup (optional)
- 1 tablespoon freshly squeezed lemon juice
- ½ teaspoon vanilla extract (optional)
- A pinch of salt
Instructions
- Preheat your oven to 170°F (75°C) or the lowest possible setting.
- Line a baking sheet with parchment paper or a silicone baking mat.
- Place the chopped fruit into a blender or food processor. Add honey or maple syrup, lemon juice, vanilla extract, and a pinch of salt. Blend until completely smooth.
- Pour the fruit mixture onto the lined baking sheet and spread evenly about 1/8 inch (3 mm) thick.
- Place the baking sheet in the oven and dry for 4-6 hours. Check after 4 hours; the edges should lift easily and the surface should feel tacky but not wet. Leave longer if still sticky.
- Let the fruit leather cool completely, then peel off and cut into strips.
- Roll each strip in parchment paper and store in an airtight container at room temperature for 1 to 2 weeks.
Notes
Use a low oven temperature to avoid cooking the fruit. Check drying progress after 4 hours and leave longer if needed. Leaving the oven door slightly ajar can help moisture escape. For vegan option, substitute honey with agave syrup. Frozen fruit should be thawed and drained before use. Thicker layers take longer to dry and may be chewier. Adding chia seeds can thicken the puree.
Nutrition
- Serving Size: One strip
- Calories: 6080
- Sugar: 1214
- Carbohydrates: 1518
- Fiber: 23
- Protein: 1
Keywords: fruit roll-ups, homemade fruit leather, healthy snack, natural sweetener, fresh fruit snack, vegan snack, gluten-free snack